


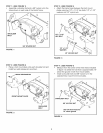
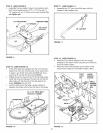

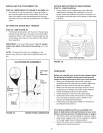

STEP 9: (SEE FIGURE 9)
• Assemble the two support tubes to the inside of each
front frame bracket using a 1/2" x 1-1/2" hex bolt, a
1/2" spacer and a 1/2" nylock nut for each bracket. Do
not tighten yet.
1/2" NYLOCK NUT SUPPORTTUBE
/ 1/2" SPACER /
_'-. J 1/2" x 1-1/2"
HEX BOLT
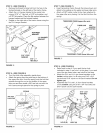
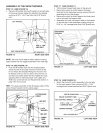
STEP 11 (SEE FIGURE 11)
, Assemble two 1/2" jam nuts all the way onto the
threads of each support link.
1/2
FIGURE 11
FIGURE 9
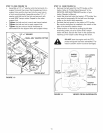
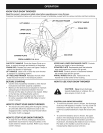
STEP 10: (SEE FIGURE 10)
* Three drive belts are supplied with the snow thrower.
Select one of the two shorter belts. If you used hole A
in step 8, use the 52" drive belt (#41353) belt. If you
used hole B, use the 55" drive belt (#46989).
Slightly loosen the hex bolt next to the flat idler pulley.
Install the drive belt between the hex bolt and the flat
idler pulley with the flat side of the belt against the
pulley. Retighten the hex bolt.
* Loop the belt around the large v-pulley, placing it
between the pulley and the hex bolt next to the pulley.
52" or 55" DRIVE BELT
(#41353) or (#46989)
LOOSEN BOLT
STEP 12: (SEE FIGURE 12)
* Attach the front frame brackets to the two hanger
brackets on the tractor frame using two pivot lock pins
and 1/8" hairpin cotters.
* Attach the rear frame brackets to the bottom of the
tractor frame using two small 5/64" hairpin cotters.
PIVOT LARGE
LOCK HAIRPIN
PIN COTTER
HAIRPIN
COTTER
5/64"
HOLE B
HOLE
FIGURE 10 FIGURE 12
10