


9
ASSEMBLY
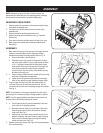
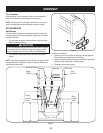
Place chute assembly onto chute base as shown in Fig. 4, 6.
making sure that the notches engage with the spiral end of chute
directional control.
Secure flange keeper removed earlier with lock nuts and screws. 7.
Tighten down nuts securing the other two flange keepers. See Fig. 5.
Ifnotalreadydone,slipthecablesthatrunfromthehandle8.
paneltothedischargechuteintothecableguideextendingover
the top of the engine. See Fig. 4.
Normally the cable ties holding the steering cables against the 9.
handle are loosely installed on each side of the lower handle at
thefactory.Pullthecabletiestighttosecure.Cuttheexcess
from the ends of cable ties.
Theextensioncordisfastenedwithacabletietotherearoftheauger
housing for shipping purposes. Cut the cable tie and remove it before
operating the snow thrower.
SET-UP
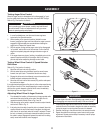
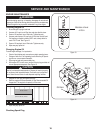
Chute Clean-Out Tool
A chute clean-out tool is fastened to the top of the auger housing
with a mounting clip. See Fig. 6. The tool is designed to clear a chute
assemblyoficeandsnow.Thisitem,alongwiththeextensioncord,is
fastened with a cable tie at the factory, which you were instructed to
cut in the previous section.
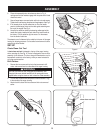
Drift Cutters
Remove the two screws and lock nuts that secure each drift 1.
cutter, and remove them from the sides of the auger housing.
Turn the drift cutters around and position them as shown in Fig. 7 2.
to the outside of the auger housing.
Attach the drift cutters with the screws and lock nuts removed 3.
earlier.
Figure 5
Figure 4
Figure 6
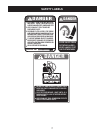
WARNING
Never use your hands to clear a clogged chute assembly. Shut
off engine and remain behind handles until all moving parts have
stopped before using the clean-out tool to clear the chute assembly.
Figure 7
Chute Clean-out Tool