


OPERATION
DR
®
SNOW THROWER Safety, Operation & Maintenance Instructions 17
Snow Removal Methods
When removing snow, do not use the DR
®
SNOW THROWER as a dozer blade to push snow. Let the
DR
®
SNOW THROWER work its way through deep drifts. If the speed of your DR
®
ALL-TERRAIN
™
MOWER is too fast, the DR
®
SNOW THROWER may become overloaded and clog. For best results,
raise the DR
®
SNOW THROWER and remove the top layers of snow, or take a half-width pass. A
second pass with the DR
®
SNOW THROWER will remove the remaining snow.
IMPORTANT: Use full RPM power when removing wet, sticky snow. Low RPM power will tend to
clog the chute.
NOTE: In heavy snow, engage and disengage the clutch lever to reduce the ground speed to a level
that will allow the engine to keep its full revolution.
!
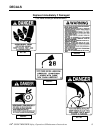
WARNING! To avoid serious personal injury, do not use hands or feet to unclog chute.
Do not attempt to clear clogged chute of snow while DR
®
ALL-TERRAIN
™
MOWER engine is
running. If the chute clogs, disengage the drive shaft, shut off the engine, remove the spark
plug wire and wait for all movement to stop, and then clear the snow from the chute.
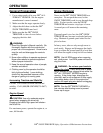
A definite pattern of operation is required to thoroughly clean an area of snow. These patterns will
avoid throwing snow in unwanted places as well as eliminating a second removal of snow.
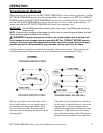
Where it is possible to throw the snow to the
left and right (above), as on a long driveway, it
is advantageous to start in the middle. Plow
from one end to the other, throwing snow to
both sides without changing the direction of the
discharge chute.
If the snow can only be thrown to one side of
the driveway or sidewalk (above), start on the
opposite side. At the end of the first pass,
rotate the discharge chute 180 degrees for the
return pass. At the end of each succeeding
pass, rotate the discharge guide 180 degrees to
maintain direction of throw in the same area.