


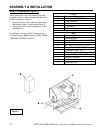
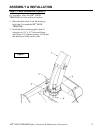


ASSEMBLY & INSTALLATION
14 DR
®
SNOW THROWER Safety, Operation & Maintenance Instructions
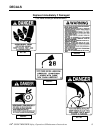
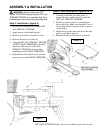
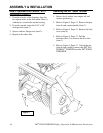
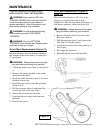
Step 6: Optional Drift Cutters - 8173
Installation (Figure 7)
1. From the exterior of the housing, align the
two square holes on the drift cutter (item 1)
with the two round holes on the housing.
2. From the outside, insert the 5/16" x 5/8"
carriage bolts (item 2).
3. Secure with two flange nuts (item 3).
4. Repeat on the other side.
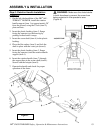
Removing the DR
®
Snow Thrower
1. Select a level surface, turn engine off and
remove ignition key
2. Refer to Figure 5, Page 13. Remove hairpin
(item 8) and rotation handle (item 7).
3. Refer to Figure 4, Page 12. Remove the belt
cover (item 4).
4. Refer to Figure 3, Page 12. Pull the
tensioner (item 3) to remove the drive belt
(item 1).
5. Refer to Figure 3, Page 12. Unlock the pin
(item 6) and carefully remove the DR
®
ALL-
TERRAIN
™
MOWER from the DR
®
SNOW
THROWER.
Figure 7