


OPERATION
DR
®
SNOW THROWER Safety, Operation & Maintenance Instructions 15
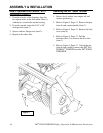
Operating Controls
The DR
®
SNOW THROWER is driven from the
DR
®
ALL-TERRAIN
™
MOWER drive pulley.
!
WARNING:
1. Do not allow bystanders near working area.
2. Do not allow anyone to ride on the DR
®
SNOW THROWER.
3. Before cleaning, adjusting or repairing the
DR
®
SNOW THROWER: bring the DR
®
ALL-
TERRAIN
™
MOWER to a complete stop, wait
for all movement to stop, apply the parking
brake, shut off the engine and remove the
spark plug wire.
4. Never put any part of your body under the
DR
®
SNOW THROWER while making
adjustments.
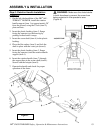
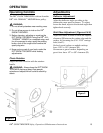
Chute Rotation
Adjust the chute direction with the rotation
handle.
!
WARNING: Always keep the DR
®
SNOW
THROWER discharge away from people,
animals and objects which could be struck by
debris.
Adjustments
Deflector Adjustment
Adjust the deflector angle according to the
distance the snow must be thrown. To adjust,
loosen the knob, adjust to the desired angle then
tighten knob securely.
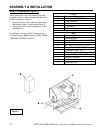
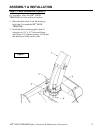
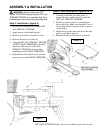
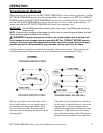
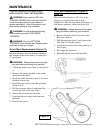
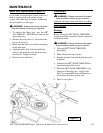
Skid Shoe Adjustment (Figures 8 & 9)
Adjust skid shoes in order to allow the required
clearance (H) between the cutting edge and the
surface, by loosening the 5/16" x 5/8" carriage
bolts (item 2).
On level paved surface or asphalt roadway:
leave 1/16" to 1/8" clearance (H).
On uneven or gravel surface, depending on
gravel size: leave 1/2" to 5/8" clearance (H).
Figure 8
Figure 9