


ASSEMBLY & INSTALLATION
DR
®
SNOW THROWER Safety, Operation & Maintenance Instructions 13
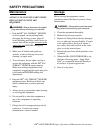
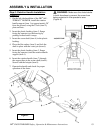
Figure 5
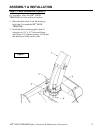
Step 5: Rotation Handle Installation
(Figure 5)
1. On the left side handlebar of the DR
®
ALL-
TERRAIN
™
MOWER, install the rotation
handle support (item 1) at approximately 28"
from the ground, using the U-bolt (item 2),
plate and nuts.
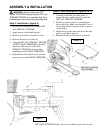
2. Insert the plastic bushing (item 3, flange
facing the operator) on the housing by
pushing forward until it snaps.
3. Insert the worm shaft (item 4) in the plastic
bushing.
4. Place the flat washer (item 5) and lock the
shaft in place with the cotter pin (item 6).
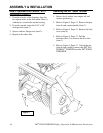
5. Insert the plastic bushing (item 3, flange
facing the operator) into the rotation handle
support (item 1).
6. Insert the rotation handle (item 7) through
the support then in the worm shaft (item 4).
Secure with the hairpin (item 8).
7. Operate the handle and check for proper
operation of the chute.
!
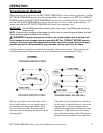
WARNING: Make sure the chute blocks
in both directions to prevent the snow from
being projected in the operator's area
(Figure 6).
Figure 6