


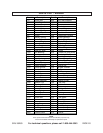
SKU 95283 For technical questions, please call 1-800-444-3353 PAGE 15
INSPECTION, MAINTENANCE, AND CLEANING
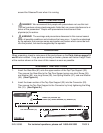
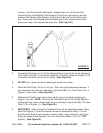
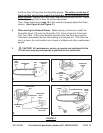
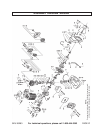
1. WARNING! Always make sure the Engine’s Power Switch (10) is in its
“OFF” position and the Spark Plug (55A) is removed prior to performing any
service, maintenance, or cleaning of the Polesaw/Pruner. (See Figure B.)
2. Before each use: Inspect the general condition of the Polesaw/Pruner. Check
misalignment or binding of moving parts, cracked or broken parts, dull or
damaged Saw Chain (74) or Guard Bar (73), and any other condition that may
affect the safe operation of the tool. If abnormal noise or vibration occurs, have
the problem corrected before further use.
Do not use damaged equipment.
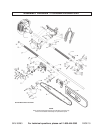
3. Saw Chain (74) maintenance: A dull, improperly sharpened, or damaged Saw
Chain can cause kickback, leading to possible personal injury. It is recommended
that only a qualified service technician attempt to sharpen or replace the Saw
Chain.
4. Spark Plug (55A) maintenance: The condition of the Spark Plug should be
checked every six months or 100 hours of tool use. If necessary, clean or replace
the Spark Plug.
5. Air Filter (42A) maintenance: The Air Filter should be checked prior to each
use of the Polesaw/Pruner for excessive dirt and debris build-up. Thereafter, the
Air Filter should be cleaned or replaced every three months or 50 hours of tool
use.
6. Drive Gear (44) maintenance: The Drive Gear assembly should be filled,
through the Gear Box Grease Fitting (50), with clean, new, automotive axle
grease every three months or 50 hours of tool use.
7. Before storing the Polesaw/Pruner, make sure to install the Guard Bar Cover
(78) onto the Guard Bar (73). Drain all fuel out of the tool’s Fuel Tank (78A). If
this is not followed, old fuel in the Fuel Tank may clog the Carburetor and prevent
the tool from starting until cleaned out. Then store the tool in a clean, dry, safe
location out of reach of children and other unauthorized people. (See Figure B.)
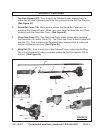
7. To install a replacement Chain: Turn the Chain Tension Adjusting Screw (39)
counterclockwise to release tension. Using the accessory Hex Wrench (83),
unscrew and remove the Nut (75) that secures the Chain Saw Cover (77) to the
unit. The Guard Bar (73) contains a Guard Bar stud slot that fits over the Guard
Bar stud. The Guard Bar also has two chain tensioning pin holes which fit over
the chain tensioning pins. Place the Guard Bar onto the bar stud so that the
chain tensioning pins fit into the chain tensioning pin holes. Fit the Chain over