COLORado™ 6 User Manual 15 7/1/2009 4:46 PM
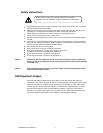
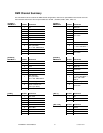
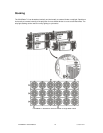
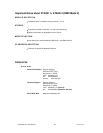
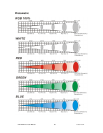
DMX Address: 001
ID Address: 01
DMX Address: 001
ID Address: 02
DMX Address: 001
ID Address: 03
DMX Address: 013
ID Address: 01
DMX Address: 013
ID Address: 02
DMX Address: 013
ID Address: 03
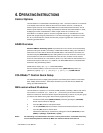
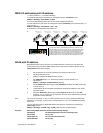
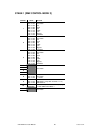
The figure above shows a simple DMX layout which has used three units at
each DMX address. The three units have different ID addresses which allows
the user to collectively control the whole group of units at that DMX address
by setting Channel 10 to 0, or to control each unit independently by first
selecting the DMX address and then by using Channel 10 to locate the target
ID address. (Note that when using ID addresses it is also possible to activate
ADAS which allows for even more option with DMX addressing and control.
DMX-512 addressing with ID address
1. Follow instructions 1 ~ 4 for DMX addressing.
2. Activate ID addressing in each fixture by setting panel function {ID ON/OFF} to ON.
{MENU} {Settings) {ID ON/OFF} [ON]
3. For every DMX starting address the user can set 66 separate ID addresses.
4. Set ID addresses in each fixture by setting panel function {ID address} to incremental values. (I.e.
1,2,3,4,5,6,etc…)
{MENU} {Settings} {ID address} [01 ~ 66]
5. ID addresses are accessible using Channel 10.
2)
ADAS with ID address
With ADAS activated it is not necessary to set DMX addresses on each fixture. The fixture will
automatically assign a temporary DMX address based on the fixture ID address and the value of
{ADAS fader no} that will be assigned.
1. Set ID addresses as previously explained in ascending numerical order.
2. Set {ADAS ON/OFF} to ON.
{MENU} {Settings} {ADAS ON/OFF} [ON]
3. Set {ADAS fader no} to “12”. Which is the number of control channels on a
COLORado™.
{MENU} {Settings} {ADAS fader no} [ 12 ]
4. Activate ADAS DMX addressing by setting Channels 8 and 10 to value 255. (Faders 8 &
10 all the way up!)
5. A DMX address will be calculated and temporarily assigned as explained in the “ADAS
Overview” section.
6. Deactivate ADAS DMX addressing by setting Channels 8, 10 and 11 to value 255.
(Faders 8, 10 & 11 and the way up!). All fixtures will return to the DMX address previously
set before the ADAS activation.
Note You must set channels 8, 10, and 11 to 255 for EACH fixture you want to deactivate ADAS DMX
addressing. For example, if a fixture has a starting address of 17, you must set DMX channels 24,
26, and 27.
You can make the temporary ADAS DMX address permanent on each fixture by selecting the
{ADAS copy} function.
{MENU} {Settings} {ADAS copy} [ ON ] (Will store the new DMX address)
Important When using ADAS, all fixtures must have the following settings;
{ID address} All ID addresses need to be set in ascending order
{ID ON/OFF} Set to [ ON ]
{ADAS fader no} All units set to the same value
{ADAS ON/OFF} Set to [ ON ]