


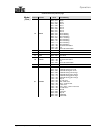
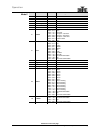
Operation
Legend 300E Spot User Manual Rev. 01g -15-
Display Settings
From the Main Menu, highlight Display Settings and press <ENTER>
(a new menu
with the DMX functions will open).
Overturn Display
1) Highlight Display Inverse (the current setting will show).
2) To overturn the display, press <ENTER> (a pop up window will open).
a) Select YES to turn the LCD around (fixture hanging from a truss) or NO to keep
the normal LCD view (fixture standing on a surface).
b) Accept the selected option.
LCD Backlight Off
1) Highlight Backlight Auto Off (the current setting will show).
2) To configure the LCD backlight, press <ENTER>.
a) Select YES to automatically turn the LCD backlight off or NO to keep the LCD
backlight always on.
b) Accept the selected option.
Backlight Brightness
1) Highlight Backlight Intensity (the current setting will show).
2) To set the backlight brightness, press <ENTER> (a pop up window will open).
a) Select the backlight brightness (1~10), being “1” the darkest and “10” the
brightest settings.
b) Accept the new value.
Temperature Unit
1) Highlight Temperature Unit (the current setting will show).
2) To select the temperature unit, press <ENTER> (a pop up window will open).
a) Select ºC to show the temperature in the Celsius scale or ºF to show the
temperature in the Fahrenheit scale.
b) Accept the selected option.
Fixture Tests
From the Main Menu, highlight Display Settings and press <ENTER>
(a new menu
with the test functions will open).
Automatic Fixture Test
1) Highlight Auto Test.
2) To start the built-in test sequence, press <ENTER>.
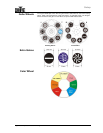
a) The fixture will start the test sequence (pan, tilt, color, CMY, gobo selection,
gobo rotation, shutter, dimmer, prism activation, prism rotation, frost, zoom, and
lamp on/off).
b) You can stop the test by pressing <MENU>.
c) Return to the previous menu.
The automatic fixture test runs only once after activation.
Manual Fixture Test
1) Highlight Manual Test and press <ENTER> (a sub-menu will open).
2) Highlight the desired attribute (the current setting will show).
3) To change the value of the selected attribute, press <ENTER> (a pop up window
will open).
a) Set the attribute value (000~255
) (the fixture will assume the new attribute value
as you change it, as if you were working with a DMX controller).
b) Accept the new value.
4) Repeat steps 2 and 3 for the other attributes.
5) When done with the test, exit to the previous menu
(the values of all tested channels
will go back to zero).