


5
Introduction
Congratulations on your purchase of the Celestron
StarSeeker! The StarSeeker ushers in a whole new genera-
tion of computer automated technology. Simple and friendly to
use, the StarSeeker is up and running after locating just three
bright objects. It’s the perfect combination of power and porta-
bility. If you are new to astronomy, you may wish to start off by
using the StarSeeker’s built-in Sky Tour feature, which com-
mands the StarSeeker to find the most interesting objects in
the sky and automatically slews to each one. Or if you are an
experienced amateur, you will appreciate the comprehensive
database of over 4,000 objects, including customized lists of
all the best deep-sky objects, bright double stars, and vari-
able stars. No matter at what level you are starting out, the
StarSeeker will unfold for you and your friends all the wonders
of the Universe.
Some of the many standard features of the StarSeeker
include:
• Incredible 4°/second slew speed.
• Fully enclosed motors and optical encoders for position
location.
• Computerized hand controller with 4,000 object data
base.
• Storage for programmable user defined objects; and
• Many other high performance features!
The StarSeeker’s deluxe features combined with Celestron’s
legendary optical standards give amateur astronomers one of
the most sophisticated and easy to use telescopes available
on the market today.
Take time to read through this manual before embarking on
your journey through the Universe. It may take a few observ-
ing sessions to become familiar with your StarSeeker, so you
should keep this manual handy until you have fully mastered
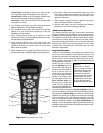
your telescope’s operation. The StarSeeker hand control has
built-in instructions to guide you through all the alignment
procedures needed to have the telescope up and running in
minutes. Use this manual in conjunction with the on-screen
instructions provided by the hand control. The manual gives
detailed information regarding each step as well as needed
reference material and helpful hints guaranteed to make your
observing experience as simple and pleasurable as possible.
Your StarSeeker telescope is designed to give you years of
fun and rewarding observations. However, there are a few
things to consider before using your telescope that will ensure
your safety and protect your equipment.
Warning
• Never look directly at the sun with the naked eye or
with a telescope (unless you have the proper solar filter).
Permanent and irreversible eye damage may result.
• Never use your telescope to project an image of the sun
onto any surface. Internal heat build-up can damage the
telescope and any accessories attached to it.
• Never use an eyepiece solar filter or a Herschel wedge.
Internal heat build-up inside the telescope can cause
these devices to crack or break, allowing unfiltered sun-
light to pass through to the eye.
• Never leave the telescope unsupervised, either when
children are present or adults who may not be familiar with
the correct operating procedures of your telescope.
Assembly
The StarSeeker comes partially assembled and can be oper-
ational in a matter of minutes. The StarSeeker is conveniently
packaged in one reusable shipping carton that contains the
following accessories:
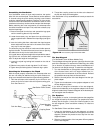
The StarSeeker reflectors (StarSeeker 114mm and 130mm)
come attached to the mount in the shipping box. To make them
fit, the tube and mount were packed very compactly at the
factory. DO NOT ATTEMPT TO REPOSITION THE MOUNT
TO ITS PROPER ORIENTATION BY HAND! Otherwise,
the gears and motors may be damaged. After removing the
assembly from the shipping box, reposition the tube and
mount as follows:
1. Remove the tube from the mount by first removing the
thumbscrew on the mount’s clamp. Open the clamp, and
remove the tube.
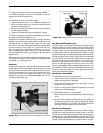
2. Plug the hand controller and battery pack (with batteries
installed, requires 8x AA batteries) into the base of the
mount.
3. Use the hand controller to select your telescope model
(see chart on page 10).
4. Now use the hand controller direction buttons to reposition
the mount until it is roughly in the position shown on page
4 of the instruction manual.
5. Replace the optical tube in the cradle and secure it with
the thumbscrew.
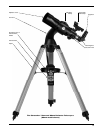
StarSeeker 70mm &
80mm
25mm, 10mm Eyepieces - 11/4"
11/4" Star Diagonal
Star Pointer Finderscope and
Mounting Bracket
Deluxe Accessory Tray
Battery Pack
Starry Night
™
SE Astronomy
Software
StarSeeker Hand Control w/
Object Database
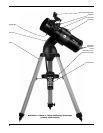
StarSeeker 114mm &
130mm
25mm, 10mm Eyepieces - 11/4"
Collimating Cap
Star Pointer Finderscope and
Mounting Bracket
Deluxe Accessory Tray
Battery Pack
Starry Night
™
SE Astronomy
Software
StarSeeker Hand Control w/
Object Database