


7
3. From underneath the tripod support brace, thread the locking bolt into the hole in the center of the accessory tray. Do
not over tighten.
The accessory tray has a built-on hand control holder protruding from the side.
The back of the hand control has an opening that slides over the clip on the
inside of the holder.
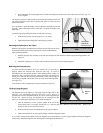
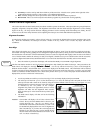
It is a good idea to adjust the height of the tripod before attaching the fork arm
and tube. Minor adjustments can be made later. To adjust the height of the
tripod legs:
Loosen the tripod leg locking bolt located on the side of each leg.
1. Slide the inner portion of each leg down 6" to 8" inches.
2. Tighten the tripod locking bolts to hold each leg in place.
A
A
t
t
t
t
a
a
c
c
h
h
i
i
n
n
g
g
t
t
h
h
e
e
T
T
e
e
l
l
e
e
s
s
c
c
o
o
p
p
e
e
t
t
o
o
t
t
h
h
e
e
T
T
r
r
i
i
p
p
o
o
d
d
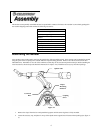
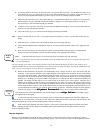
With the tripod properly assembled, the telescope tube and fork arm can easily
be attached using the quick release coupling screw located underneath the
tripod mounting platform:
1. Hold the telescope tube assembly by the fork arm and place the fork arm base inside the tripod mounting platform. See
Figure 2-1.
2. Thread the coupling screw into the hole at the bottom of the fork arm base and hand tighten.
B
B
a
a
l
l
a
a
n
n
c
c
i
i
n
n
g
g
t
t
h
h
e
e
T
T
e
e
l
l
e
e
s
s
c
c
o
o
p
p
e
e
t
t
u
u
b
b
e
e
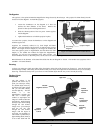
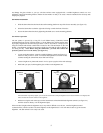
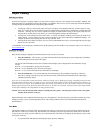
To ensure optimal performance from your NexStar 80 it is necessary to
properly balance the telescope tube inside the tube ring. To assist in
balancing the tube, the NexStar 80 has a Solar Warning sticker to help you
position the tube. To balance the tube, simply loosen the tube clamp ring
locking screw and slide the telescope tube forward or back until the edge of
the tube ring is aligned with the line at the top of the Solar Warning sticker.
(see Figure 2-3)
Your NexStar is fully assembled and is ready to attach the accessories.
T
T
h
h
e
e
E
E
r
r
e
e
c
c
t
t
I
I
m
m
a
a
g
g
e
e
D
D
i
i
a
a
g
g
o
o
n
n
a
a
l
l
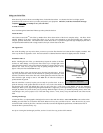
The diagonal diverts the light at a right angle from the light path of the
telescope. For astronomical observing, this allows you to observe in
positions that are more comfortable than if you were to look straight through
the tube. For daytime viewing, the diagonal uses an erecting prism that
allows you see land objects right-side-up To attach the diagonal:
1. Turn the thumbscrew on the eyepiece adapter at the end of the
focuser barrel until it no longer extends into (i.e., obstructs) the inner diameter of the focus barrel. Remove the
protective dust cap from the focuser barrel.
2. Slide the chrome portion of the diagonal into the eyepiece adapter.
3. Tighten the thumbscrew on the eyepiece adapter to hold the diagonal in place.
If you wish to change the orientation of the star diagonal, loosen the thumbscrew on the eyepiece adapter until the star diagonal
rotates freely. Rotate the diagonal to the desired position and tighten the thumbscrew.
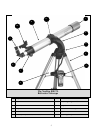
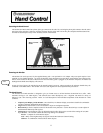
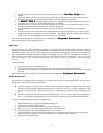
Figure 2-2 – The Accessory Tray/ Hand Control
Holder
Accessory
Tray
Locking Bolt
(underneath
Accessory Tray)
B
B
a
a
l
l
a
a
n
n
c
c
e
e
L
L
i
i
n
n
e
e
T
T
u
u
b
b
e
e
C
C
l
l
a
a
m
m
p
p
L
L
o
o
c
c
k
k
i
i
n
n
g
g
S
S
c
c
r
r
e
e
w
w
F
F
i
i
g
g
u
u
r
r
e
e
2
2
-
-
3
3
–
–
B
B
a
a
l
l
a
a
n
n
c
c
i
i
n
n
g
g
t
t
h
h
e
e
T
T
e
e
l
l
e
e
s
s
c
c
o
o
p
p
e
e
T
T
u
u
b
b
e
e