


14
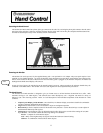
Y Use the Up and Down scroll keys to choose between City Database and Custom Site. City Database will allow you to
select the closest city to your observing site from a list of either international or U.S. location. Custom Site allows you
to enter the exact longitude and latitude of your observing site. Select City Database and press ENTER.
Y The hand control will allow you to choose from either U.S. or international locations. For a listing of U.S. locations by
state and then by city, press ENTER while United States is displayed. For international locations, use the Up or
Down scroll key to select International and press ENTER.
Y To display a list of local cities, first select your state from the alphabetical listing (or a list of countries if International
locations was selected) and press ENTER.
Y Choose the closest city to your location from the displayed list and press ENTER.
Time - Enter the current time for your area. You can enter either the local time (i.e. 8:00), or you can enter military time (i.e.
20:00).
Y Select PM or AM. If military time was entered, the hand control will bypass this step.
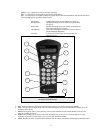
Y Choose between Standard time or Daylight Savings time. Use the Up and Down scroll buttons (10) to toggle between
options.
Y Select the time zone that you are observing from. Again, use the Up and Down buttons (10) to scroll through the
choices. For time zone information, refer to the Time Zone map in the appendix of this manual.
Date - Enter the month, day and year of your observing session. The display will read: mm/dd/yy.
If the wrong information has been input into the hand control, the UNDO button will act as a backspace allowing the user
to re-enter information.
The next time that your NexStar is auto aligned, the hand control will automatically display the last location (either a city or
longitude/latitude) that was entered. Press ENTER to accept these parameters if they still apply. Pressing the UNDO button will
allow you to go back and select a new city location or longitude/latitude.
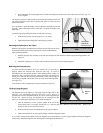
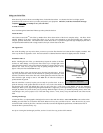
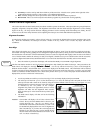
Y Based on this information, the NexStar will automatically select a bright star that is above the horizon and slew
towards it. At this point the telescope is only roughly aligned, so the alignment star should only be close to the field of
view of the Star Pointer finder. Once finished slewing, the display will ask you to use the arrow buttons to align the
selected star with the red dot in the center of the Star Pointer. If for some reason the chosen star is not visible (perhaps
behind a tree or building) you can press UNDO to select and slew to a different star. Once centered in the finder, press
ENTER. The display will then instruct you to center the star in the field of view of the eyepiece. When the star is
centered, press ALIGN to accept this star as your first alignment star. (There is no need to adjust the slewing rate of the
motors after each alignment step. The NexStar automatically selects the best slewing rate for aligning objects in both
the Star Pointer and the eyepiece). After the first alignment star has been entered the NexStar will automatically slew to
a second alignment star and have you repeat the same procedure for that star. When the telescope has been aligned to
both stars the display will read
Alignment Succ
Alignment SuccAlignment Succ
Alignment Successful
essfulessful
essful
, and you are now ready to find your first object.
If the wrong star was centered and aligned to, the NexStar display will read
Align Failed
Align FailedAlign Failed
Align Failed
. Press UNDO to begin
the alignment procedure again.
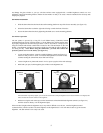
If you are not sure if the correct star was centered, always remember that the alignment star will be the brightest star
nearest the field of view of the finder. There may be other fainter stars visible that are closer to the center of the Star Pointer, but
the actual alignment star will be obviously brighter than any other star in the area.
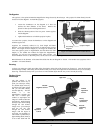
When centering the alignment stars in the eyepiece, use the up arrow button and the right arrow button on the hand
control. Centering the star from this direction will eliminate much of the backlash between the gears and assure the most
accurate alignment possible.
T
T
w
w
o
o
S
S
t
t
a
a
r
r
A
A
l
l
i
i
g
g
n
n
m
m
e
e
n
n
t
t
With the two-star alignment method, the NexStar requires the user to know the positions of only two bright stars in order to
accnurately align the telescope with the sky and begin finding objects. Here is an overview of the two-star alignment procedure:
Hel
p
ful
Hints
Observing
T
T
i
i
p
p
s
s