


13
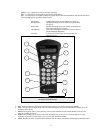
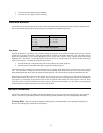
10. Scroll Keys: Used to scroll up and down within any of the menu lists. A double arrow symbol on the right side of the
LCD indicates that the scroll keys can be used to view additional information.
11. Rate: Instantly changes the rate of speed of the motors when the direction buttons are pressed.
12. RS-232 Jack: Allows use with a computer and software programs for point and click slewing capability.
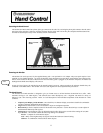
Hand Control Operation
This section describes the basic hand control procedures needed to operate the NexStar. These procedures are grouped into three
categories: Alignment, Setup and Utilities. The alignment section deals with the initial telescope alignment as well as finding
objects in the sky; the setup section discusses changing parameters such as tracking mode and tracking rate; finally, the last
section reviews all of the utility functions such as adjusting the telescopes slew limits and backlash compensation.
A
A
l
l
i
i
g
g
n
n
m
m
e
e
n
n
t
t
P
P
r
r
o
o
c
c
e
e
d
d
u
u
r
r
e
e
In order for the NexStar to accurately point to objects in the sky, it must first be aligned with two known positions (stars) in the
sky. With this information, the telescope can create a model of the sky, which it uses to locate any object with known
coordinates.
A
A
u
u
t
t
o
o
-
-
A
A
l
l
i
i
g
g
n
n
Auto-Align is the easiest way to get your NexStar aligned and ready to observe. Even if you do not know a single star in the sky,
the NexStar will align itself by guiding the user through the alignment procedure by asking for basic information like the date,
time and location. The NexStar will then automatically choose two stars for alignment and roughly center the stars in the field of
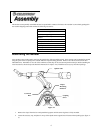
view of the Star Pointer. Before the telescope is ready to be aligned, it should be set up in an outside location with all accessories
(eyepiece, diagonal and Star Pointer) attached and lens cover removed as described in the Assembly section of the manual.
1. Once the NexStar is powered on the display will read NexStar Ready. Press ENTER to begin alignment.
The first time that the NexStar is used, it will request information to help identify the model of telescope. Once powered on, the
hand control will display the message
Select Model
Select ModelSelect Model
Select Model
. Use the Up and Down menu keys (10) to scroll through the
different NexStar models. Press ENTER when NexStar 80 is displayed on the hand control. This information will be retained
for future use and will not be displayed again. If for some reason the incorrect model was selected or you wish to use your hand
control on a different NexStar model, the Select Model utility feature allows you to re-select the proper NexStar model from the
displayed list (see Select Model later in this section).
2. Use the Up and Down scroll keys to select AutoAlign if it is not already displayed, and press ENTER.
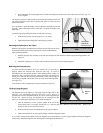
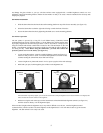
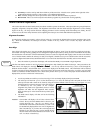
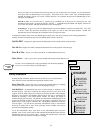
3. The telescope will then ask you to use the direction keys (3) to level the telescope tube and point the front of the
telescope towards north. North can be found by using the compass affixed to the accessory tray (see figure 3-3). Use
the hand control to point the telescope in the same direction
as indicated by the red pointer on the compass.
Alignment only needs to be approximate, however a close
alignment will make the auto alignment more accurate.
Once the telescope is in the north and level position, press
ENTER.
4. The hand control display will then ask for the following
information:
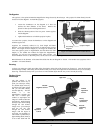
Location - The NexStar will display a list of cities to choose from.
Choose the city from the database that is closest to your
current observing site. The city you choose will be
remembered in the hand controls memory so that it will
be automatically displayed the next time an alignment is
done. Alternatively, if you know the exact longitude and
latitude of your observing site, it can be entered directly
into the hand control and remembered for future use as
well. To choose a location city:
Important
F
F
i
i
g
g
u
u
r
r
e
e
3
3
-
-
3
3
T
FindingNorth and Level Position