


14
DC Control
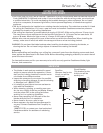
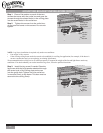
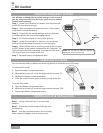
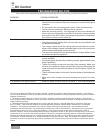
CONTROL HOLSTER INSTALLATION
Step 1. Locate a 2x4 wall stud in a convenient
location.
Step 1. Orient the control bracket as shown over
the 2x4 stud.
Step 1. Use the provided screws in the mounting
holes. Install and tighten screws by hand only.
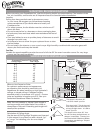
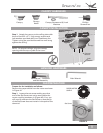
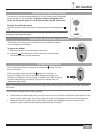
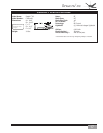
CHANGING FREQUENCY SETTING
You will have to change the dip switch settings in the remote if
you are using more than one fan in the same area and want to
control them separately.
Step 1. At the circuit breaker or fusebox, turn the power off
for the fan you want to change.
Step 2. Open the battery compartment door of the remote
control and remove the battery.
Step 3. Change the dip switch settings, assuring that they
are different from the previously installed fan(s).
Step 4. Re-install the battery in the proper polarity.
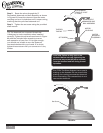
Step 5. At the circuit breaker or fuse box, turn the power
back on for the fan whose frequency you are changing.
Step 6. Within 60 seconds of restoring power, push and hold
the SET button in the battery compartment for 5 seconds. The
light will ash two times indicating completion of this step.
You should now have control of the fan.
Step 7. Reinstall battery compartment door.
Note: You may want to label your controls to
assure you do not mix them up.
1 2 3 4
ON ECE
ON
D
1 2 3 4
ON ECE
SET
SET
BUTTON
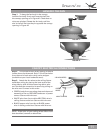
OPERATION CFL MODE
Your fan has the ability to disable the dimming feature to allow the use of CFL bulbs.
To activate CFL mode:
1. Open the battery compartment door.
2. With the fan power off, move the toggle switch towards "D".
3. Replace the battery compartment door.
4. Press the power button again to restore power to the fan.
To cancel CFL mode:
5. Open the battery compartment door.
6. With the fan power off, move the toggle switch towards "ON".
7. Replace the battery compartment door.
1 2 3 4
ON ECE
ON
D
SET
D
ON