


7
CANDELIER
™
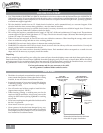
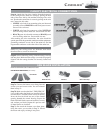
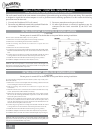
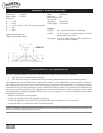
Step 6a. Attach the fan wires (coming from the downrod)
to the ceiling fi xture outlet box wiring by placing the bare
ends of the wires side by side and then securing with a wire
nut. Test that the connection is secure by pulling on the wire
nut. Connect in this order:
• GREEN wire leads from mounting plate and downrod
assembly of fan to GROUND conductor of power source.
Secure with a wire nut.
• WHITE wire from fan connects to white NEUTRAL
wire in ceiling fi xture outlet box. Secure with wire nut.
• BLACK power wire from fan connects to BLACK power
wire in ceiling outlet box. Secure with wire nut.
After making the wire connections, the wires should be
spread apart with the grounded conductor and the equipment-
grounding conductor on one side of the outlet box and the
ungrounded conductor on the other side of the outlet box.
NOTE: If your ceiling wires are different from those
described above, consult an electrician.
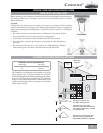
Step 6b. After connecting wiring, slide the canopy cover up
and into place. Make sure the canopy cover tabs are properly
aligned with the canopy bracket and securely locked into
place.
CANOPY ELECTRICAL CONNECTIONS
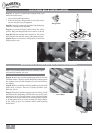
Step 7a. Unscrew the bottom cover fi tter plate and
set the cover and screws aside. You will reinstall
them in Step 7c.
Step 7b. Make sure that the label “THIS SIDE UP”
is not visible when the blades are installed. Please
note the label is installed on the actual fan blades.
Insert the fi rst fan blade into one of the slanted
opening beneath the control housing. Secure the
blade with black blade screws and washers (3 screws
and washers per blade). Repeat this process until
all three blades are installed.
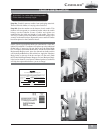
Step 7c. Re-attach the bottom cover fi tter plate,
using the screws you set aside in Step 7a. Secure
the motor end cap by twisting it into place.
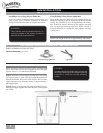
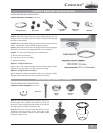
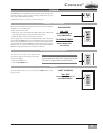
FAN BLADE INSTALLATION
PARTS NEEDED FOR THIS SECTION:
FAN BLADE HARDWARE (not to scale)
Blade Screws
Washers Motor End Cap
Fan Blades