


5
CANDELIER
™
CANOPY BRACKET INSTALLATION
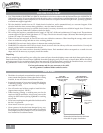
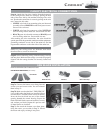
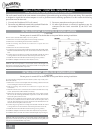
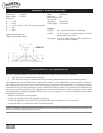
Step 2a. Hold the canopy bracket up to the ceiling with the ‘lip’ side
facing the fl oor. Use a pen or pencil to mark screw placement through
the holes in the bracket.
Step 2b. Insert three black rubber grommets to the canopy bracket as
shown. The bracket is then installed facing the ceiling.
Step 2c. Drill holes on both sides of canopy bracket for even support.
Select the set of screws most appropriate for your installation.
Step2d. Use one of the following screw combinations:
A. Wood screws and washers
B. Long wood screws and washers
C. Sheetrock anchors
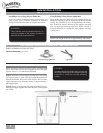
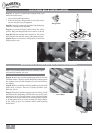
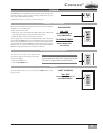
Option 1: Using Wood Screws
Install screws and washers through the holes in the canopy bracket.
Tighten screws until they are secure against the ceiling.
Option 2: Using Sheetrock Anchors
Install sheetrock anchors through the holes in the canopy bracket.
Tighten anchors until they are secure against the ceiling.
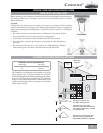
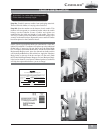
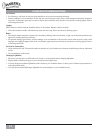
Step 3a. Slide the hanging bracket support ring on to
the downrod. Then, slide the downrod cover over the
downrod. The base of the downrod should sit securely on
the rubber gasket inside the downrod cover.
Step 3b. Place the downrod (with the downrod cover
attached) inside the canopy cover. The edge of the
downrod cover should sit securely on the rubber gasket
inside the canopy cover.
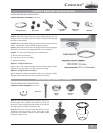
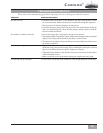
PARTS NEEDED FOR THIS SECTION:
INSTALLING CANOPY COVER
PARTS NEEDED FOR THIS SECTION:
Canopy Bracket
CANOPY BRACKET HARDWARE (not to scale)
Wood
Screws
Long Wood
Screws
Sheetrock
Anchor Washers
CANOPY COVER HARDWARE (not to scale)
Downrod
Support
Ring
Downrod
Cover
Canopy
Cover
Grommets
#8-32 x 1/4"
Screws