


2010 Portable Spa
LTR20101001, Rev. B
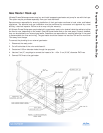
Preparing for Your New Portable Spa
www.calspas.com
11
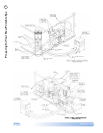
Filling and Powering Up Your Portable Spa
Open the air relief valve (located next to the two 6.
lters, if equipped) after the air bubbles stop
coming out of it. Close the valve hand-tight.
Once the water is at the correct level and air is 7.
bled, turn on the power at the RCD breaker.
NOTE: When the power is turned on to the spa, it
will perform a diagnostic check for approximately ve
minutes. When the diagnostic is complete, the spa
will automatically operate at lter speed and continue
heating until the spa water temperature reaches the
default temperature of 37.5˚C.
If no water is owing when the pump is running 8.
there could be an air pocket at the suction side of
the pump. Shut off power to the spa and loosen
the pump union on the suction side of the pump
to bleed the air. When air is bled, turn power
back on.
Re-install the lter and the lter basket into the 9.
skimmer/lter canister.
The spa is now ready for use.
NOTE: Never run the spa with the gate valves closed
or without water circulating for long periods of time.
Be careful not to over-tighten the plumbing ttings.
Never ll your spa with soft water. Soft water makes it
impossible to maintain the proper water chemistry and
may cause the water to foam, which will ultimately
harm the nish of the spa and void your warranty.
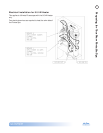
Once the spa has been placed on an approved 1.
surface and has been correctly wired by a licensed
electrician, inspect all plumbing connections in the
equipment area of your spa. Ensure that these
connections are secure and that they did not
loosen during shipment.
If equipped, open all gate valves in the equipment 2.
area. Before operating the spa, these valves must
be in the UP or OPEN position.
Remove the lter basket and cartridge from 3.
skimmer/lter canister.
Place a garden hose in the skimmer/lter canister 4.
and ll your spa with regular tap water to the
proper water level (halfway up the skimmer
area).
(For owners of the automatic bromine generator) 5.
Make sure the dial on the face of the bromine
generator unit is turned to the OFF position.