


7
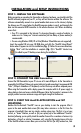
STEP 4: SETTING UP THE RECEIVER UNIT
The Receiver may be powered by batteries or from the included AC adapter. To use the AC
adapter, insert the round plug into the jack on the lower left side of the unit, then connect it
to a wall outlet. To install batteries, slide the battery door down in the direction of the arrow
to remove it, and insert four AA batteries (alkaline or lithium) in the indicated direction.
Replace the battery door. Insert the included easel stand into the key slot (above the battery
door) on the back of the Receiver unit, then rotate it (clockwise) into place so the stand
will prop up the Receiver unit and allow it to stand upright. Note: as soon as batteries are
installed or the AC adapter is connected, the unit will power on, and run through a display test
routine, cycling through the various backlight colors, then displaying letters and numbers in
various sections of the display-this is normal, and takes less than a minute. When completed,
the display will show a “Searching for PC” message (press SEARCH on the back of the
Receiver if it does not). Keep the Receiver near the PC until the setup is complete-then you
may move it anywhere in your home, up to about 245 ft (75m) from the Transmitter.
STEP 5: TRANSMIT DATA FROM PC SOFTWARE TO THE
RECEIVER
This is a simple process, in fact it’s normally completely automatic after the initial setup.
First, make sure the Receiver displays the “Searching for PC” message. If it isn’t, press the
SEARCH button on the back of the Receiver-you should then see the “Searching...” message,
and the Signal strength icon (
)on the top left corner of the display should be blinking.
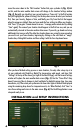
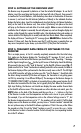
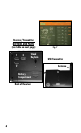
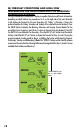
All you need to do now is click “Send To Receiver” on the HuntFXi software screen (Fig. 7)
(make sure the first or “home” location box is selected), and within a few seconds, the data on
the Receiver display will be synchronized to the data currently seen on the PC. The LED light
on the USB Transmitter will glow red when you click “Send To Receiver”, then blink while
the data is being transmitted (if this does not happen, the Transmitter is not getting power
via USB- try connecting it to a different USB port). The message on the Receiver changes to
“PC FOUND-PLS WAIT 5 MINS” as the data is transmitted-it may take several minutes for all
the data to be transmitted the rst time, but is typically fairly fast. When the Transmitter’s
light stops ashing, the Receiver unit should now display the same weather forecast data
as the HuntFXi software screen. If the temperature or other data does not match, press the
UNITS button on the back of the Receiver and then use the + / - buttons on the front
of the Receiver to make sure the temperature and other units are set to your preference
(for example, if you set the temperature units on the software Settings screen to “F”, but
the Receiver temperature units are set to “C”, the numbers will not match). If all the data
display areas on the Receiver are blank, you may have a “Favorite Location” selected that
has not yet been setup in the HuntFXi software application. If that’s the case, either follow
the procedure in Step 3 to set the “blank” location on your PC, or press the + or - button
on the Receiver to select a Favorite Location # which already has a corresponding location
box in the PC software.