


E. Place tractor in gear and proceed forward.
Increase speed to 3/4 throttle. Lower tiller into soil.
Increase speed to 540 PTO rpm. Average soil with
reasonable moisture will allow travel speeds up to 2
mph. Hard soil will require low travel speed, less
than 1 mph to ensure smooth operation and maxi-
mum possible depth. Shallow weed cultivation will
allow speeds up to 3 mph. At the end of a pass lift
tiller clear of ground before making a turn. After
turning, proceed back across field, slowly lowering
the tiller into the soil. Do not turn with tiller in the
ground as this can damage tiller and tractor link-
age. Never use reverse gear while tiller is low-
ered into ground. Avoid operating tiller in the
raised position.
3-4 TRANSPORTING
Do not engage PTO drive while transporting tiller.
Obey all state and local laws when transporting on
public roads. Always use flashing warning lights
unless prohibited by law.
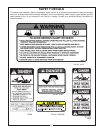
STAY CLEAR OF ROTATING DRIVELINES.
DO NOT OPERATE WITHOUT DRIVELINE
SHIELDS IN PLACE AND IN GOOD CONDI-
TION. FAILURE TO HEED THESE WARN-
INGS MAY RESULT IN PERSONAL INJURY
OR DEATH.
KEEP HANDS AND FEET FROM UNDER
MACHINE AT ALL TIMES. MAKE CERTAIN
EVERYONE IS CLEAR OF MACHINE
BEFORE OPERATING. FAILURE TO HEED
THESE WARNINGS MAY RESULT IN PER-
SONAL INJURY OR DEATH.
DANGER
DANGER
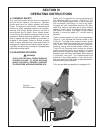
3-3 OPERATION
A. Perform BEFORE EACH USE maintenance
listed in paragraph 4-1.
B. Adjust for work per paragraph 3-2.
C. Start tractor. Raise tiller off the ground.
D. With tractor at idle speed, engage PTO drive.
SECTION IV
MAINTENANCE
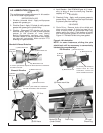
4-1 MAINTENANCE CHECK LIST
Perform scheduled maintenance as outlined below.
Lower machine to ground, turn off tractor and set
parking brake before doing maintenance inspections
or work. Some checks may require raising machine
off ground and supporting with blocks. All bolts
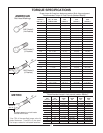
should be torqued as recommended in TORQUE
SPECIFICATIONS, unless otherwise indicated.
BEFORE EACH USE
1. Check tractor tire air pressure. Refer to tractor
operator’s manual.
2. Check blades and rotor to be sure that no foreign
objects such as wire or steel strapping bands are
wrapped around them.
3. Check blade bolts for tightness. Tighten to
73 ft./lbs.
4. Inspect blades for wear. Replace if necessary.
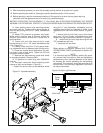
5. Make certain driveline shields are in place and in
good repair.
6. Clean any debris from safety decals and check
for legibility. Replace any missing or illegible
decals. Read and heed safety messages.
7. Perform BEFORE EACH USE lubrication per
paragraph 4-2.
8. During operation, listen for abnormal sounds
which might indicate loose parts, damaged bear-
ings, or other damage.
AFTER EACH USE
1. Clean all debris from machine especially underside
of deck and affixed decals. Replace any missing or
illegible decals.
2. Inspect tiller for worn or damaged components.
Repair or replace before next use. Any replace-
ment components installed during repair shall
include the components current safety decals
specified by the manufacturer to be affixed to the
component.
3. Store in dry place.
WARNING
THE TILLER CAN FALL FROM HYDRAULIC
SYSTEM FAILURE. TO AVOID SERIOUS
INJURY OR DEATH, SECURELY SUPPORT
TILLER BEFORE WORKING UNDER-
NEATH.
THE TILLER CAN FALL FROM HYDRAULIC
SYSTEM FAILURE. TO AVOID SERIOUS
INJURY OR DEATH, SECURELY SUPPORT
TILLER BEFORE WORKING UNDER-
NEATH.
WARNING
10