


I-TRIM
®
23
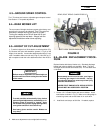
7.4—CHARGING A BATTERY
To avoid possible injury, stand away from
battery when charger is turned on. A damaged
battery or a battery with an internal short could
explode
Charge battery ONLY in a well verted location, away from
sparks or open flame.
1. Remove the battery from the tractor before charging.
2. Be sure charger is “off “.
3. Connect charger leads to battery. Connect the positive
(+) connector from the charger to the positive battery
terminal. Connect the negative. (–) connector of the
charger to the negative battery terminal.
4. Charge the battery using one of the methods shown below.
Follow the manufacturer’s instructions on the charger.
5. If when charging the battery, if violent gassing or spewing
of electrolyte occurs, or the battery case feel hot
(125*F - 52C), reduce or temporarily halt charging to avoid
damaging battery.
6. Always turn charger to “off” before removing a charger
lead from the battery.
7.5—BELTS
There are no belts on the I-Trim.
7.6—ENGINE FUEL FILTER
Before servicing the fuel filter, thoroughly clean outside of filter
housing and fuel hoses, dirt must not be allowed to enter into
fuel or fuel system. Refer to manufacturer’s Engine Manual for
instructions.
7.7—ENGINE
Refer to manufacturer’s Engine Manual for maintenance
schedule recommendations. Change oil and oil filter after the
first 50 hours of operation.
7.9—HYDRAULIC HOSES
To avoid serious bodily injury, always lower mow-
ers to the ground, place all controls in neutral
and shut off engine before inspecting hydraulic
lines or hoses. Never run hands across tubes,
hoses or fittings to check for leaks.
Hydraulic hose and tube lines should be inspected every week
to check for cuts, loose connections, kinks and wear.
Be sure tubes and hoses do not come in contact withother
frame parts which could cause abrasive wear. Always replace
worn hoses or tubes before operating machine.
1. Assemble nut, sleeves and tube to fitting body with
minimum torque (finger tight) until flare contacts
seat on fitting body.
2. For tightening reference, mark a line lengthwise on both
the nut and adapter fitting with a marker.
3. Using a wrench, rotate the nut to tighten. Turn the nut the
amount shown in the chart below. The line will show which
fitting have been tightened and how much.
4. On hoses with “o-ring” fittings, make sure o-rings are
clean and hose fittings are properly seated by hand before
wrench tightening.
5. Hold the fixed portion of the hose coupling with one
wrench; use a second wrench to tighten or loosen the hose
nut. This will prevent damage to the fitting seal. When
tightening a hose, do not allow it to twist; hold it in a
normal, straight position.
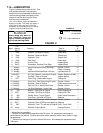
Tube O.D. or hose, Rotate Number. of flats
3/8” 2
1/2” 2
5/8” 1-1/2 to 2
1” 3/4 to 1
7.8—ELECTRICAL SYSTEM
Make certain all terminals and connections are kept clean and
properly secured.
1. Check switches regularly to be sure they are kept clean
and operating correctly
2. Keep wire harness and all individual wires away from
moving parts, hot parts, or sharp edges. this will prevent
abrasive wear or potential short circuits.
3. Exercise extreme care when working with electrical
system.