


12
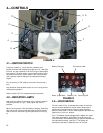
FIGURE B
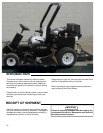
2—ASSEMBLY INSTRUCTIONS
2.1—TRACTOR ASSEMBLY
Handle banding material with caution. Use heavy
leather gloves. Banding is sharp!
The side and rear lift arms are spring-loaded up.
Take care when handeling.
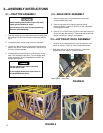
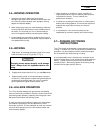
1. Remove crating top, front and sides from the tractor crate.
Cut banding from Roll-Over Protective Structure (ROPS)
Fig A.
2. Cut banding from around tractor frame to crate base.
3. Unbolt rear deck motor from crate base and temporarily
strap to rear lift arm. Leave wood spacer in place on rear
lift arm to prevent damage.
3. Release parking brake and push or drive tractor off the
crate. See operating instructions. Do not engage deck
motors until tractor is fully assembled with decks. Re-
engage parking brake.
Use jack stands under tractor whenever
elevated off the tires.
Do not engage deck motors untill tractor is
fully assembled with decks.
2.2—REAR DECK ASSEMBLY
1. Remove crating top, front and sides from deck crate.
Unscrew blades from crate.
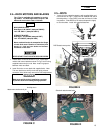
2. Remove rear deck from crate and position behind
tractor as shown in Figure C. Remove roll pin and washer
from attachment shaft.
3. Insert a 1/2” rod into lift arm (Fig B) to lower and line-up the
lift arm with the deck bushing. Insert shaft and secure with
washer and roll pin. Remove wood spacer.
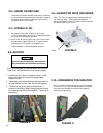
2.3—LEFT/RIGHT DECK ASSEMBLY
1. Remove left and right decks from crate and position near
tractor as shown in Figure D. Remove attachment bolts.
2. Hold down and line-up lift arms with decks. Attach with
supplied bolts and washers. Install lift chains.
FIGURE A
Insert rod
Wood Spacer