


36
www.simplicitymfg.com | www.snapper.com
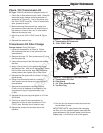
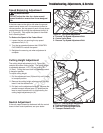
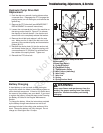
Suspension Adjustment
(Select Models)
The shock assembly can be adjusted to vary the
amount of pre-load applied to the springs. This
allows the operator to customize the ride according to
operator’s weight and operating conditions.
Less Pre-Load:
• Light operator weight
• Softer, more cushioned ride
• Best for relatively flat terrain
More Pre-Load:
• Heavy operator weight
• Stiffer, more rigid ride
• Better handling and greater stability on hilly terrain
To adjust the spring pre-load:
1. Park machine on a flat, level surface. Disengage
the PTO, stop the engine and engage the parking
brake.
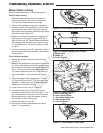
2. See Figure 35. Turn the pre-load adjustment
collar (A) CLOCKWISE to increase the pre-load,
turn COUNTER-CLOCKWISE to decrease the pre-
load. Make sure both front shocks are set to the
same amount of pre-load. Make sure both rear
shocks are set to the same amount of pre-load.
NOTE: After adjusting the front shock assembly,
move the o-ring against the adjustment collar to
prevent the collar from loosening during operation.
Figure 35. Suspension Adjustment
A. Front Shock Adjustment Collar
A
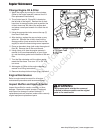
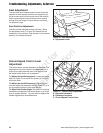
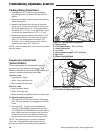
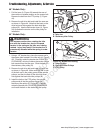
Figure 34. Parking Brake Adjustment
A. Brake Spring
B. First Measurement - .50” (1,27 cm)
C. Brake Spring Rod
D. Lock Nut
E. Second Measurement - .375” (0,95 cm)
F. Set Collar
G. Brake Shaft Weldment
Parking Brake Adjustment
1. Disengage the PTO, stop the engine, engage
the parking brake, and remove the key from the
ignition.
2. Raise the seat plate to gain access to the parking
brake components.
3. Measure the distance from the top of the brake
spring rod (C, Figure 34) to the top of the lock nut
(D) on both sides of the unit. The measurement
should be .50” (1,27 cm). If not, adjust the locknut
to achieve the measurement of .50” (1,27 cm).
4. Measure the distance between the bottom of the
brake shaft weldment (G) and the top of the set
collar (F). The measurement should be .375”
(0,95 cm). If not, position the set collar until the
measurement equals .375” (0,95 cm).
NOTE: If this procedure does not correct the problem
see your dealer.
E
F
D
B
A
C
G
Troubleshooting, Adjustments, & Service
Not for
Reproduction