


4
ASSEMBLY
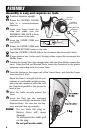
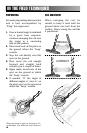
Assembly is easy and requires no tools.
●
1 Position detector upright.
●
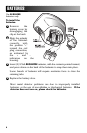
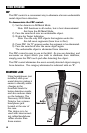
2 Rotate the LOCKING COLLAR
fully in a counterclockwise
direction.
●
3 Insert your finger inside the
tube and make sure the
INTERNAL CAM LOCK is flush
with the inside of the tube.
●
4 Insert the LOWER STEM into
the S-ROD.
●
5 Rotate the LOWER STEM until
the SILVER BUTTON locates in the hole.
●
6 Twist the LOCKING COLLAR fully in the clockwise direction until it locks.
●
7 If your detector has 3 tubes and 2 locking collars, repeat this processon the
Middle Stem.
●
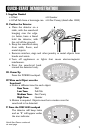
8 Position the Lower Stem (the straight tube) with the Silver Button toward the
back. Using the Bolt and Knurled Knob, attach the Searchcoil to the plastic
extension protruding from the Lower Stem.
●
9 Press the button on the upper end of the Lower Stem, and slide the Lower
Stem into the S-Rod.
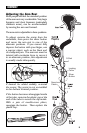
Adjust the Stem to a length that lets you
maintain a comfortable upright posture,
with your arm relaxed at your side, and
the Searchcoil parallel to the ground in
front of you.
●
10 Wind the Cable securely around the
Stem.
●
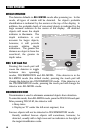
11 Insert the Plug into the matching
Connector on the right underside of the
Detector Body. Be sure that the key-
way and pins line up correctly.
Caution: Do not force the plug in.
Excess force will cause
damage.
To disconnect the cable, pull
on the plug.
Do not pull on the cable.
S-ROD
LOCKING
COLLAR
INTERNAL
CAM LOCK
SILVER BUTTON
MIDDLE
STEM
S-ROD
MIDDLE STEM