10
• Clean the chipper shredder by running water
from a hose through the hopper assembly
and chipper chute with the engine running.
Allow the chipper-shredder to dry thoroughly.
NOTE: Cleaning with a forceful spray of water is
not recommended as water could contaminate the
fuel system.
• Wash the bag periodically with water. Allow to
dry thoroughly in the shade. Do not use heat.
ENGINE OIL
The engine oil is the most important “insurance
policy” your new chipper shredder has. It protects it
from excess wear and tear and helps the cooling
process. It is important that you maintain the
engine oil at the proper level and that it is changed
on a regular basis.
• Service the engine oil according to the
separate engine owner’s guide supplied with
your chipper shredder.
AIR CLEANER
The air cleaner prevents damaging dirt, dust, etc.,
from entering the carburetor and being forced into
the engine and is important to engine life and
performance. Never run the engine without air
cleaner completely assembled.
• Service the air cleaner according to the
separate engine owner’s guide supplied with
your chipper shredder.
CARBURETOR
WARNING: If any adjustments are made
to the engine while the engine is running
(e.g. carburetor), keep clear of all moving
parts. Be careful of heated surfaces and
muffler.
• Service the carburetor according to the
separate engine owner’s guide supplied with
your chipper shredder.
ENGINE SPEED
• The engine speed on your chipper-shredder
has been set at the factory. Do not attempt to
increase engine speed or it may result in
personal injury. If you believe the engine is
running too fast or too slow, take your chipper-
shredder to the nearest service center for
repair and adjustment.
SPARK PLUG
• Service the spark plug according to the
separate engine owner’s guide supplied with
your chipper shredder.
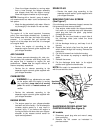
REMOVING THE FLAIL SCREEN
(See Figure 7)
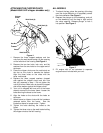
If the discharge area becomes clogged, remove the
flail screen and clean area as follows:
1. Stop engine, make certain the chipper-shredder
has come to a complete stop and disconnect
spark plug wire from the spark plug before
unclogging the chute.
2. Remove the two hand knobs on each side of
the discharge chute (also called the chute
deflector).
3. Lift the discharge chute up, and keep it out of
the way.
4. Remove two hairpin clips from the clevis pins
which extend through the housing. Remove the
clevis pins.
5. Pull the flail screen from inside the housing.
6. Clean the screen by scraping or washing with
water.
7. Reinstall the screen.
8. Put the discharge chute back to its original
position and tighten the hand knobs.
NOTE: Be certain to reassemble the flail screen
with the curved side down
Figure 7
SHARPENING OR REPLACING THE
CHIPPER BLADES (See Figure 8)
All models
1. Disconnect spark plug wire and move it away
from spark plug.
2. Remove the flail screen as instructed in
previous section.
Hex Nuts
Washers
Chipper Chute
Hand Knobs
Flail
Screen
Clevis
Pin
Hairpin
Clip
Discharge
Chute


