


Part No 830542 Form No F062007A
10
VQ Owner’s Manual
OPERATION
STORAGE
Never store engine indoors or in enclosed poorly ventilated areas with fuel in tank, where fuel fumes may reach
an open flame, spark or pilot light, as on a furnace, water heater, clothes dryer or other gas appliance.
If engine is to be unused for 30 days or more, prepare as follows:
Remove all gasoline from carburetor and fuel tank to prevent gum deposits from forming on these parts and
causing possible malfunction of engine. Drain fuel outdoors, into an approved container, away from open flame. Be
sure engine is cool. Do not smoke. Run engine until fuel tank is empty and engine runs out of gasoline.
NOTE: Fuel stabilizer (such as Sta-Bil) is an acceptable alternative in minimizing the formation of fuel gum deposits
during storage. Add stabilizer to gasoline in fuel tank or storage container. Always follow mix ratio found on
stabilizer container. Run engine at least 10 min. after adding stabilizer to allow it to reach the carburetor.
Like all mechanical tools, reasonable care must be used when operating machine.
Inspect machine work area and machine before operating. Make sure that all operators of this
equipment are trained in general machine use and safety.
PUT OIL IN ENGINE BEFORE STARTING
STARTING
ENGINE: See engine manufacturer’s instructions for type and amount of oil and gasoline used. Engine must be level
when checking and filling oil and gasoline.
ENGINE SPEED: Controlled by throttle lever on left side of handle. Under normal conditions operate at minimum throttle
to accomplish your current cleaning task. For Honda model, the stop switch is located on the switch panel on the engine
& for SP Honda models only, on remote shift control panel. NOTE: Before starting, check that all switches and fuel
valves are on.
FUEL VALVE: Move fuel shutoff valve to "ON" position.
CHOKE: Located on engine. Choke engine before starting when engine is cold.
THROTTLE: Move remote throttle control to fast position. Pull starting rope to start engine.
IF YOUR UNIT FAILS TO START:
See Troubleshooting on page 16.
HANDLING & TRANSPORTING:
Do not lift by hand. Use loading ramps or other mechanical assistance. Secure in place during
transport. See page 3 for weight specifications
Never lift the machine while the engine is running.
VACUUMING OPERATION
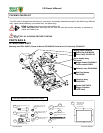
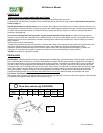
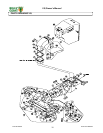
VACUUM NOZZLE HEIGHT ADJUSTMENT: Is adjusted by unlocking wing nut (item 32) and turning caster knob. Turning the
knob clockwise increases height. Be sure the nozzle height is level (left to right) before tightening caster wing nuts.
A
djust nozzle height according to surface conditions and debris size; For vacuuming on flat surfaces, set nozzle 1/2" (12.7 mm) to
5/8" (15.8 mm) above ground; Higher for uneven terrain and turf. Note: The nozzle side bogie wheels should be at least 1/8"
(3.2mm) above the ground, or maneuverability will be reduced.
FOR MAXIMUM PICKUP: Adjust nozzle close to debris, but without blocking airflow into the nozzle.
NOTE: Never bury nozzle into debris.
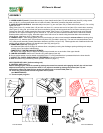
CLEARING A CLOGGED NOZZLE & EXHAUST: Turn engine off and wait for impeller to stop completely and
disconnect spark plug wire. Wearing durable gloves, remove clog. Danger, the clog may contain sharp materials. Reconnect
spark plug wire.
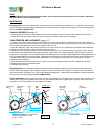
NOZZLE GOBBLER DOOR.
Large debris can be vacuumed without readjusting nozzle height by temporarily opening the remote Nozzle Gobbler Door. For
maximum pickup of small debris, the gobbler door must be down, flush with front face of nozzle.