


8
OPERATION
STARTING THE SPREADER
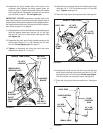
1. Pull the flow control arm back against the flow control
gauge for the "ON" position. This opens the closure plate
in the bottom of the hopper and starts the material flow.
See figure 15.
2. Always start the spreader in motion before moving the
flow control arm to the on position.
STOPPING THE SPREADER
1. Push the flow control arm forward for the "OFF" position.
This closes the closure plate in the bottom of the hopper
and stops the material flow. See figure 15.
2. Always move the flow control arm to the off position while
the spreader is still in motion.
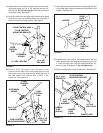
SETTING THE FLOW RATE
1. Move the flow control arm to the "OFF" position.
2. Determine the proper flow rate setting by referring to the
application charts on page 9 and to the instructions on
the chemical package.
3. Loosen the hand knob and move the flow control gauge
to the recommended setting and retighten the hand
knob. See figure 15.
SETTING THE SPREADER SHIELD
SPREADER SHIELD RAISED
For a normal spread pattern used in open areas, loosen the
plastic knob on each side of the shield, raise the shield and
retighten the knobs.
SPREADER SHIELD LOWERED
For a restricted spread pattern when applying material to a
confined area or next to sensitive plants, loosed the plastic
knob on each side of the shield, lower the shield and
retighten the knobs.
FIGURE 15
OFF
ON
FLOW
CONTROL
ARM
FLOW RATE SETTINGS
HAND KNOB
FLOW
CONTROL
GAUGE
OFF-ON
0 1 2 3 4 5 6 7 8 9 10
USING THE SPREADER
1. Determine approximate square footage of area to be
covered and estimate amount of fertilizer or seed re-
quired.
2. With flow control arm in off position, set flow rate gauge
at number indicated in flow rate chart for light or heavy
application rate. Also refer to instructions on bag for
manufacturers recommended settings.
3. With the flow control arm set at the off position, fill the
hopper with up to 125 pounds of material, breaking up
lumpy fertilizer as you fill hopper. The hopper screen
helps prevent any large lumps from clogging the open-
ing in the bottom of the hopper.
4. To broadcast, always start the spreader in motion before
opening the closure plate.
5. Walk at a brisk pace when spreading. The application
charts are based on a ground speed of 3 m.p.h. which
equals travelling 100 feet in 23 seconds.
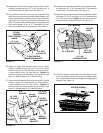
6. Overlap the spread pattern to insure uniform coverage
at the edges. Approximate distance between each pass
is shown in the application diagrams in figure 16.
7. When using weed control fertilizers make sure the
broadcast pattern does not hit evergreen trees, flowers
or shrubs. The spreader shield may be lowered to limit
the dispersal pattern. Adjust the flow control according
to the application chart on page 9.
8. Do not allow the spreader to sit stationary with the flow
control arm in ON position. If fertilizer is accidentally
deposited too heavily in a small area, soak the area
down thoroughly with a garden hose to prevent burning
of the lawn.
FIGURE 16
SHIELD DOWN
SHIELD UP
OVERLAP
3' to
4'
OVERLAP
8' to
10'