


6
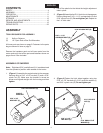
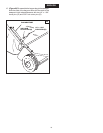
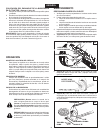
9. (Figure 7) Assemble the height adjustment handle to
the height adjustment tube as shown in gure six. Use
two curved head bolts (C), bowed washers (L), 5/16"
lock washers (K) and 5/16" hex nuts (H). Do not tighten
yet.
10. (Figure 7) Assemble the grip onto the height adjustment
handle.
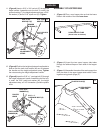
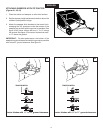
If your tractor hitch has 11" to 13" ground clearance refer
to gure 4. If your tractor hitch has 8" to 11" ground
clearance refer to gure 5.
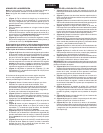
5. (Figure 4 or 5) Assemble the hitch brackets to the hitch
tubes using two 5/16" x 2" hex bolts (B) and 5/16" nylock
nuts (G). The bolts should straddle the front hitch tube
bolt. Do not tighten yet.
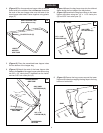
6. At this time tighten the four bolts fastening the hitch
tubes to the sweeper housing. Next, tighten the two bolts
fastening the ends of the hitch tubes together. Finally,
tighten the two bolts fastening the hitch brackets to the
hitch tubes.
7. (Figure 4 or 5) Assemble the hitch pin (Y), two 3/4"
spacers (U) and the 1/8" hair cotter pin (N) to the hitch
brackets.
4
7
5
ENGLISH
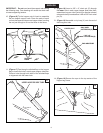
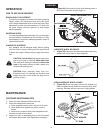
If your tractor hitch has 13" or more ground clearance
refer to gure 6, otherwise proceed to gure 7.
8. (Figure 6) Move the rear support brace that came
assembled to the rear of the sweeper to the bottom set
of holes in the sweeper end plates. This will allow the
sweeper bag to sit level when the sweeper is attached
to a tractor with a taller hitch.
6
5/16" x 2"
HEX BOLT (B)
5/16" NYLOCK
NUT (G)
3/4" SPACER (U)
HITCH PIN (Y)
HITCH BRACKET
(STRAIGHT)
1/8" HAIR
COTTER PIN (N)
HITCH BRACKET
5/16" x 2"
HEX BOLT (B)
5/16" NYLOCK
NUT (G)
3/4" SPACER (U)
HITCH BRACKET
HITCH BRACKET
(STRAIGHT)
1/8" HAIR
COTTER PIN (N)
HITCH PIN (Y)
VIEWED FROM REAR OF SWEEPER
REAR SUPPORT BRACE
BOTTOM HOLE
CURVED
HEAD BOLT (C)
5/16" HEX NUT (H)
BOWED
WASHER (L)
5/16" LOCK
WASHER (K)
HEIGHT
ADJUSTMENT
HANDLE
GRIP