13
CUTTING METHODS
WARNING: Useminimumspeedand
do not crowd the line when cutting around
hard objects (rock, gravel, fence posts, etc.),
whichcandam agethetrimmerhead,become
entangled in the line, or be thrown causing a
serious hazard.
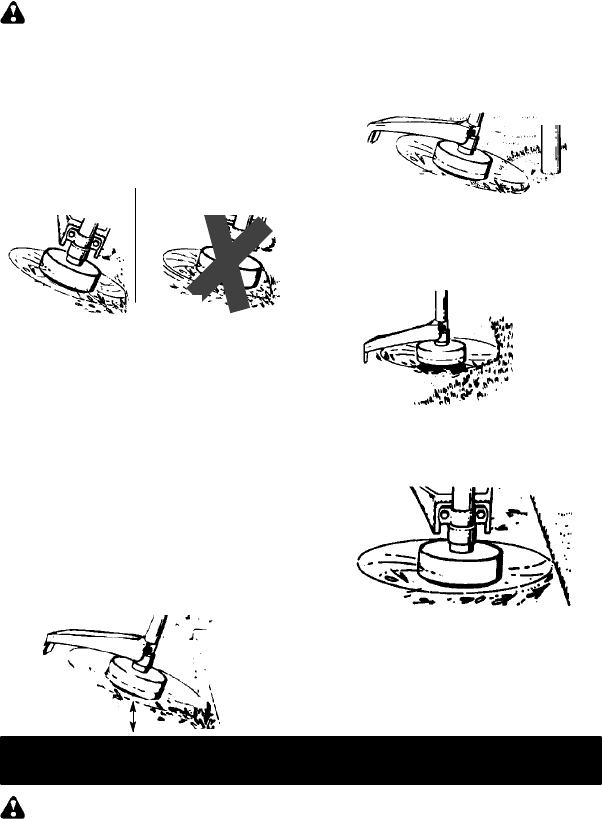
S The t ipof the line does the cutting. You will
achieve the best performance and mini-
mumline wearby notcrowdingthe lineinto
the cutting area. The rightand wrong ways
are shown below.
Tip of the Line
Does The Cutting
Right
Line Crowded Into
Work Area
Wrong
S The line will easily remove grass and
weedsfromaroundwalls,fences,treesand
flower beds, but it also can cut the tender
bark of trees or shrubs and scar fences.
S For trimming or scalping, use less than full
throttle to increase line life and decrease
head wear, especially:
S During light duty cutting.
S Near objects around which the line can
wrap such as small posts, trees or fence
wire .
S Formowingorsweeping,usefullthrottlefor
a good clean job.
TRIMMING -- Hold the bottom of the trimmer
headabout 3inches (8cm) abovetheground
andatanangle.Allowonly thetipof t helineto
make contact. Do not force trimmer line into
work area.
Trimming
3 inches (8 cm)
above ground
SCALPING -- The scalping technique re-
moves unwanted vegetation down to the
ground. Hold the bottom of the trimmer head
about 3in.(8 cm)above t heground andatan
angle. Allow the tip of the line to strike the
ground aroundtrees, posts, monuments,etc.
This technique increases line wear .
Scalping
MOWING -- Your trimmer is ideal for mowing
in places conventional lawn mowers cannot
reach. In the mowing position, keep the line
parallel to the ground. Avoid pressing the
head into the ground as this can scalp the
ground and damage the tool.
Mowing
SWEEPING-- Thefanning actionoftherotat-
ing line can be used for a quick and easy
clean up. Keep the line parallel to and above
the surfaces being swept and move the tool
from side to side.
Sweeping
MAINTENANCE
WARNING: Disconnect unit from
power source before performing m aintenance.
CHECK FOR LOOSE
FA STENERS AND PARTS
S Housing screws
S Assist handle screw
S Debris shield
CHECK FOR DAMAGED OR
WORN PARTS
Contact your authorized service dealer for re-
placement of damaged or worn parts.
S T riggerswitch --Ensuretriggerswitchfunc-
tionsproperlybypressingandreleasingthe
trigger switch. M ake sure motor starts and
stops.
S Debris Shield -- Discontinue use of unit if
debris shield is damaged.
INSPECT AND CLEAN UNIT AND
LABELS
S After each use, inspect complete unit for
looseordamagedparts. Cleantheunitand
labels using a damp cloth.
S Wipe of f unit with a clean dry cloth.


