


12
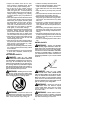
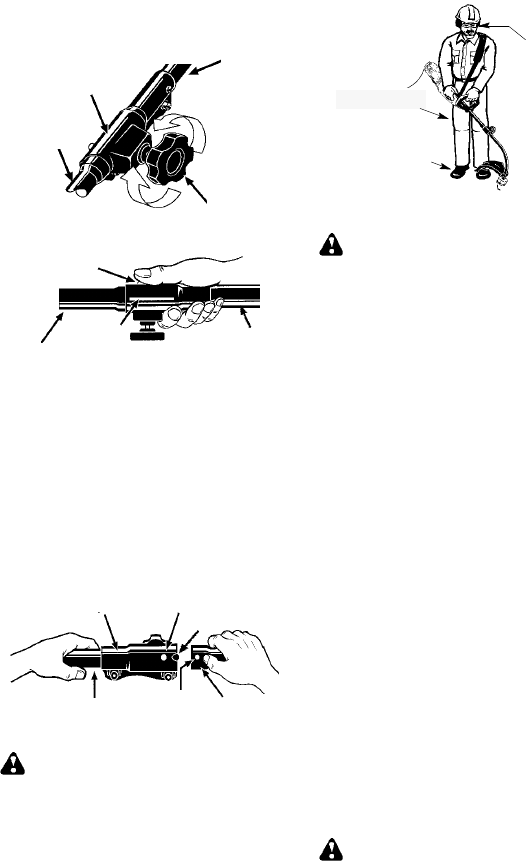
REMOVING LINE TRIMMER
ATTACHMENT OR OTHER
OPTIONAL ATTACH MENTS
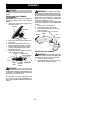
CAUTION: When removing or installing at-
tachments, place theunit on aflat surfacefor
stability.
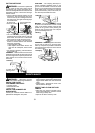
1. Loosen the coupler by turning the knob
counterclockwise.
Coupler
K
nob
LOOSEN
TIGHTEN
Upper Sha
f
t
Lower
Attachment
2. Press and hold the locking/release button.
Locking/Release
Button
Coupler
Upper Shaft
A
t
t
a
c
h
m
e
n
t
3. While securely holding the motor hous-
ing and upper shaft, pull the attachment
straight out of the coupler.
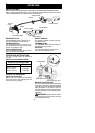
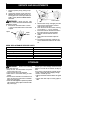
INSTALLING OPTIONAL ATTACH -
MENTS
1. Remove the shaft cap from the attach-
ment (if present).
2. Position locking/release button of at-
tachment into guide recess o f coupler .
3. Push the attachment into the coupler
until the locking/release button snaps
into the primary hole.
4. Before using the unit, tighten the knob
securely by turning clockwise.
Coupler
Primary Hole
Upper
Shaft
Locking/
Release
Button
Attachment
Guide Recess
WARNING: M ake sure the locking/
release button is locked in the primary hole
andthe knobis securely tightenedbefore o p -
erating the unit.
INSTALLING ATTACH MEN T
HANGER
An att achmenthanger isprovidedforstorage
when attachment is not in use.
To install hanger on attachment:
1. Remove the shaft cap from the attach-
ment (if present) and discard.
2. Press and hold the locking/release button.
3. Push hanger onto the attachment until
the locking/release button snaps into
the hole.
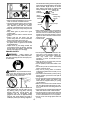
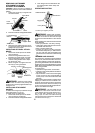
OPERATING POSITION
Eye Protection
Heavy Shoes
ALWAYS WEAR:
Cut from your right to your left.
Long Pants
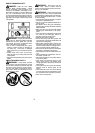
WARNING: Always wear eye protec-
tion. Never lean over the trimmer head. Rocks
or debris can ricochet or be thrown into eyes
and face and cause blindness or other serious
injury .
Whenoperatingunit, standasshown andcheck
for the following:
S W ear eye protection and heavy clothing.
S Hold trigger handle with right hand and as-
sist handle with left hand.
S Keep unit below waist level.
S Cutfromyour rig httoyour lefttoensurede-
brisisthrownawayfromyou.Withoutbend-
ing over, keep line near and parallel to the
groundandnot crowdedinto materialbeing
cut.
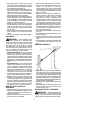
TRIMMER LINE ADVANCE
The trimmer line will advance approximately 2
inches (5 cm) each time the bottom of the trim-
mer head is tapped o n the ground with the en-
ginerunningat f ullthrottle. Themost e fficientline
lengthis themaximumlength a llowedby theline
limiter.Always keeptheshield i nplacewhenthe
tool is being operated.
To advance line:
S Operate the engine/motor at full throttle.
S Holdthetrimmerheadparalleltoandabove
the grassy area.
S Tap the bottom of the trimmer head lightly
on the ground one time. Approximately 2
inches (5 cm) o f line will be advanced with
each tap.
Always tap the trimmer head on a grassy area.
Tapping on surfaces such as concrete or as-
phalt can cause excessive wear to the trimmer
head. If the line i s worn downto 2inches (5 cm)
or less, morethan onetap willbe requiredtoob-
tain the m ost e f ficient line length.
WARNING: Use only 0.080” (2 mm)
diameter line. Other sizes of line will not ad-
vance properly and can cause serious injury .
Do not use other materials such as wire,
string, rope, etc. Wire can break off during
cutting and becomea dangerous missile that
can cause serious injury.