9
S Chargecontinuously whennotin u se.Con-
tinuous charging will not damage the bat-
tery. The charger will automatically keep
the battery charged and ready for use dur-
ing storage.
S During charging, the charger becomes
warm. This is normal and means the char-
ger is operating correctly.
TO CHARGE YOUR UNIT:
1. Place the trimmer in the wall bracket.
2. Plug the charger into a standard house-
hold electrical outlet.
3. Whenproperly connected,theredcharge
indicator light (LED) will glow.
NOTE: The red charge indicator light
(LED) on t hecharger glows continuously
during charging.
4. The battery will be fully charged in 24
hours.
RECHARGING YOUR UNIT
S Rechargethebatteryas soonasthecutting
powerof yourcordless trimmeris nolonger
effective.
S A void running the battery into full dis-
charge, i.e.avoid drainingthe battery com-
pletely.
S Follow the p rocedure outli n ed in the
CHARGING YOUR UNIT section.
S Recharging the battery according to these
instructions should ensure maximum bat-
tery life.
S Donotrechargethebatteryinanareaofex-
treme heat or cold. It will work best a t nor-
mal room temperature.
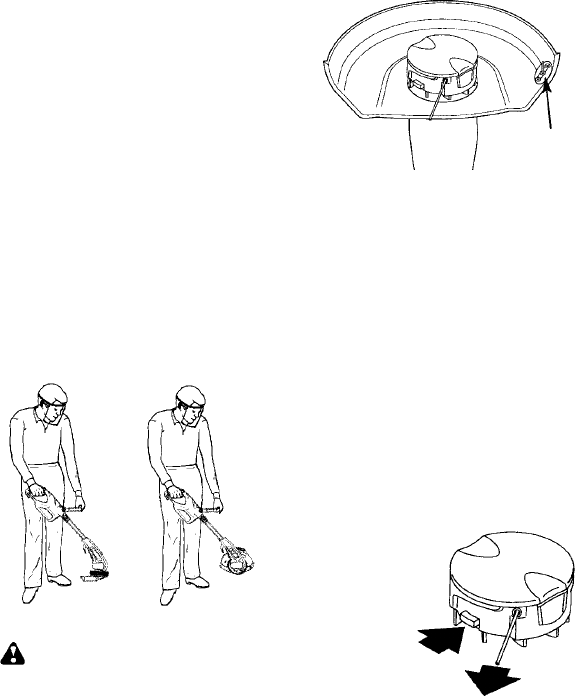
CORRECT OPERATING POSITION
Trimming Edging
WARNING: Alwaysweareyeprotec-
tion. Never lean over the trimmer head.
Rocks o rdebriscanricochetorbethrowninto
eyes and face and cause blindness or other
serious injury.
When operating unit, stand as shown and
check for the following:
S Wear eye protection and heavy clothing.
S Hold trigger handle with right hand and as-
sist handle with left hand.
S Keep unit below waist level.
S Cut only from your right to your left to en-
sure debris is thr own away fr omyou. With-
out bending over, keep linenear and paral-
lel to the ground and not crowded into
material being cut.
AUTOMATIC LINE FEED SYSTEM
When the trimmer is initially started, a small
length of cutting line is fed out.
Line Limiter Pin
Afterapproximately 5seconds,thelinewillbe
cut to the correct length b y the line limiter pin
as the motor reaches full speed. Make sure
the motor is up to full speed before trim-
ming. If the noise of the cutting line being cut
cannot be heard, more line will need to be fed
out.
To feed more line:
S Allowthemotortostopcompletely;then,re-
start the motor and allow it to reach full
speed.
S Repeatuntilyouhearthelinehittingagainst
thelinelimiterpin (donot repeatthis proce-
dure more than 6 times).
If problems are experienced with the auto-
matic line feed, refer to the TROUBLE-
SHOOTING TABLE.
To manually feed the nylon line:
S If required, the cutting line can be fed out
manually .
S To operate, press and release manual line
feed button while gently pulling on one of
the line until it reaches the line limiter pin.
Manual Line
Feed Button
S If the line extends past the line limiter pin,
toomuch linehas beenfed out. I f too much
line is fed out, remove the spool cap and
click spoolcounterclockwiseuntilthelineis
at the desired length.


