


5
S Have all service and maintenance not ex-
plained inthis manualperformedby anautho-
rized service dealer to avoid creating a haz-
ard.
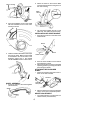
S Never douse or squirt the unit with water or
any other liquid. Clean unit and labels with a
damp sponge. Keep handles dry, clean, and
free from oil and grease.
S Keep the air vents clean and free of debris to
avoid o verheatingthemotor . Clean aftereach
use.
TRANSPORTI NG AND STORAGE
S Stop the unit and place in wall bracket for
storage and battery charging.
S Carry the unit with motor stopped.
S Store unitindoors i nahigh, dry placeoutof
the reach of children.
S Donothangunitsothatthetrigger switchis
depressed.
BATTERY CARE
S If over a period of time the battery quickly
runs dow nafterafull 24hourchargingperi-
od, a replacement battery is needed.
S There will be some charge present in thebat-
tery,but toensure maximumrunning time, re-
charge your battery for 24 hours before use.
S Permanent connection to the charger in a
well--ventilated area will automatically keep
your battery fully charged and ready for use.
S Toprevent permanent battery damage, never
store i n a discharged conditio n.
S Battery
Sealed for Life
No maintenance required
S Battery replacement
Should your battery need to be replaced,
contactyourauthorizedservicedealerfora
replacementbattery and for proper dispos-
al of the old battery.
WINTER STORAGE
S Fully charge for 24 hours before winter stor-
age.
S If you are unable to leave your cordless
trimmer on permanent charge, recharge
the battery every 3 to 4 months for a full24
hourchargingperiodtofullychargethebat-
tery during winter storage.
S A void extended storage without recharge.
S Store in a cool dry place.
IMPORTANT!
DISPOSE OF YOUR OLD BATTERIES
SAFELY. TAKE THE COMPLETE UNIT
TO YOUR AUTHORIZED SERVICE
DEALER. DO NOT CUT OPEN, BURN
OR INCINERATE.
SAVE THESE INSTRUCTIONS
ASSEMBLY
WARNING: If received assembled,
review allassembly steps toensure your unit
is properly assembled and all fasteners are
secure.
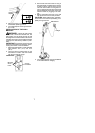
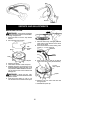
SHAFT ASSEMBLY
WARNING: Ensure that the excess
wire between the switch handle and motor
housing i s not t wisted and is enclosed in switch
handle and motor housing during assembly of
theunit. F ailuretodo somay r esultin d amageto
the wires and/or the unit or serious injury to the
operator.
1. Push the tube intothe switch handle until
it snaps into place.
Switch Handle
Tube
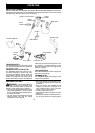
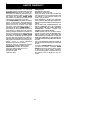
2. Push thetube intothe motor housinguntil
it snaps into place.
Tube
Motor Housing
3. T ry to remove tube from switch handle and
motor housing. If the tube remains in place,
it is properly snapped into place. If the tube
will not remain in place, repeat steps 1 and
2. Push until the tube snaps into place.
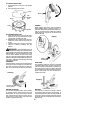
ATTACHING THE SHIELD
WARNING: The shield must be prop-
erly installe d.The shieldprovides parti alprotec-
tion from therisk of thrown objects to theopera-
tor and others. Your unit is equipped with a line
limite r pin, which cuts excess lin e to the proper
length while running.
NOTE: If shield is not properly installed, dam-
age to unit (including motor failure) will result.
1. Place the shield onto the m otor housing.
Ensure the cutting head remains free to
rotate and the line is not caught between
the shield and the motor housing (see il-
lustration).