


13
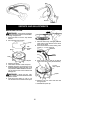
USER REPLACEABLE SERVICE PARTS
Spool with 0.065″ Trimmer Line 545124406
Spool Cap 545124417
Assist Handle 545124407
Wheel 545124409
Battery (authorized distributor replacement item) 545124412
Charger GPE182--120120--1 525802301
Wall Mount Bracket 545124411
REPLACEMENT PART SERVICE PART NUMBER
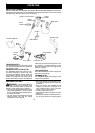
STORAGE
WARNING: Perform the following
steps after each use.
S Stop the unit and place in wall bracket for
storage and battery charging.
S Carry the unit with motor stopped.
S Store unit in a high, dry place out of the
reach of children.
S Store unit with all guards in place. Position
unit so that any sharp object cannot acci-
dentally cause injury.
TROUBLE
CAUSE REMEDY
Trimmer head
stops under a
load or does not
turn when switch
is pressed.
1. Allow tip of line to do the cutting.
2. Charge battery.
3. Remove debris.
Line does not
advance, line is
too short, or
trimmer vibrates.
1. Check line routing.
2. Rewind line tightly and evenly.
3. Use only 0.065 in. (1.65 mm) dia. line.
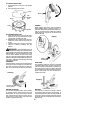
4. Remove spool cap and spool. Manually
feed line. Reinstall cap and spool. See
Automatic Line Feed System section.
5. Rewind line tightly and evenly. Check
that line is in correct section of spool.
6. Clean unit.
Excessive noise
when unit is run-
ning.
1. Allow the motor to reach full speed
before use.
2. Rewind line tightly and evenly . See
Automatic Line Feed System section.
3. Contact your authorized service dealer.
Line releases
continuously.
1. Check line routing.
2. Replace spool.
TROUBLESHOOTING TABLE
1. Line improperly
routed in head.
2. Spool damaged.
1. Motor has not reached
full speed before use.
2. Too much line has been
released from the spool.
3. Line limiter pin missing
from shield.
1. Line improperly routed
in head.
2. Line improperly
wound into spool.
3. Incorrect line size
4. Not enough line
outside of head.
5. Manual line feed not
working.
6. Dirt buildup on unit.
1. Crowding trimmer line
against m a terial being
cut.
2. Battery needs charging.
3. Debris stopping head.
Line usage is
excessive.
1. Check line routing.
2. Replace spool.
3. Cut with tip of line fully extended.
4. Replace spool.
1. Line improperly routed
in head.
2. Line size is incorrect.
3. Crowding line against
material being cut.
4. Spool worn or damaged.
WARNING: Always stop unit b efore performing allof the recommended remedies be-
low exce ptremedi es thatrequireunitto beoperating.Keephands andfingers a wayfrom
the trigger switch to avoid accidental starting.
Wheel stops
turning.
1. Dirt or debris buildup
on wheel or in groove.
1. Clean wheel and groove on motor
housing (see Maintenance section).