6
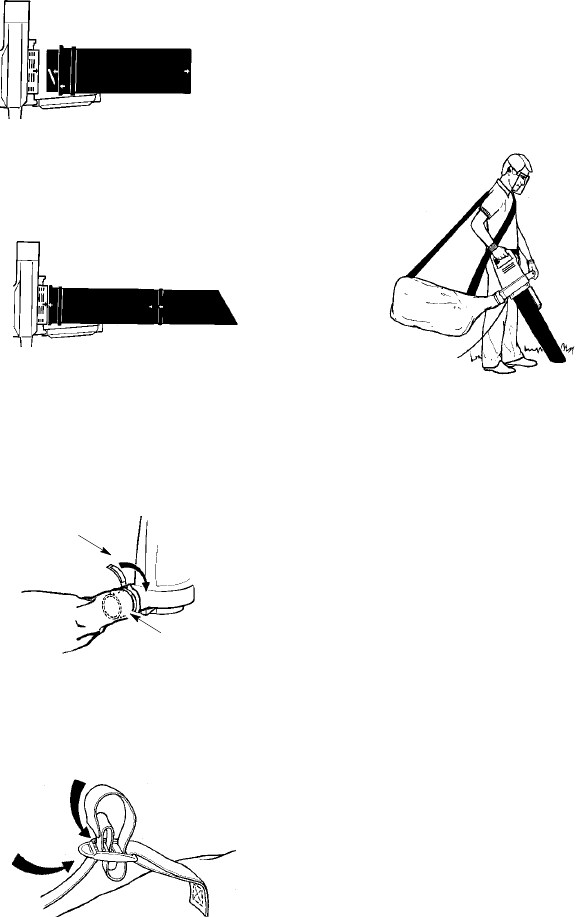
Align arrows on tube and unit
4. Toattachthelowervacuumtubetothe
upper vacuum tube, first align the ar-
rowsonthetwotubes.Then,pressthe
two tubestogetheruntilthelowertube
is securely seated in the upper tube
(about 3 inches).
Upper Tube
Lower Tube
ATTACH THE COLLECTION BAG
Slide the opening of the collection bag
over the blower outlet. Pull the v elcro
strap tightly through the buckle and se-
cure to the velcro tabs.
NOTE: Make sure the velcro strap is lo-
cated on the blower outlet as shown be-
low. Also, make sure the zipper on the
bag is completely closed.
Velcro Strap
Collection
Bag
Blower Outlet
ADJUSTING THE SHOULDER STRAP
ON THE COLLECTION BAG
1. Carefully loop the shoulder strap
through the buc kle as shown in the il-
lustration below.
First In
Last In
2. Pos ition the unit on you r right-hand
side, blower outlet and bag pointing
toward the rear. Hold the unitin anup-
right position with the lower vacuum
tube on the ground to s upport it.
3. Place the shoulder strap ove r your
head and onto your left shoulder.
4. Adjust the strap to allow a free flow of
air from the blower. If the collection
bag is kinked, the unit will not operate
properly.
NOTE: The st r ap is designed to posit i on
the collecti on bag on your shoulder wit hout
kinks. The strap is not i nt ended to support
the wei g ht of t he uni t.
Shoulder strap
on left shoulder
No kinks in bag
allows free air flow
HOW TO CONVERT UNIT FROM
VACU UM USE TO BLOWER USE
1. Stop unit and u nplug the extension
cord.
2. Remove the vacuum tubes and
collection bag.
3. Install the inlet restrictor that was re-
moved when asse mbling for vacuum
use.
NOTE:Ifyouareunabletolocate theinlet
restrictor,theunitwillstilloperate.Thisre-
strictor improves the blower function.
4. Close the inlet cover and make sure it
is latched closed.
5. Re-install the blower tubes. Refer to
the section
ATTACHING THE BLOWER
TUBE AND NOZZLE
for instructions on
how to attach these items.
SELECT AN EXTENSION CORD
Use onl y a 120 A.C. voltage supply as
shown on the nameplate of the unit.
The extension cor d used t oreach thepow-
er so urce m ust be:
D Specifically marked as suitable for out-
door use. The cord must be m ar ked with
the s uffix “W-A” (in C anad a “W ”).
D Heavy enough to carr y full curr ent f r om
the power sou rce to t he unit. O therwise,
loss of power and over heati ng can occur
causing damage to unit . Referto table f or
minimum wir e g auge recommendations.
The cord mustbe markedwith t heproper
wir e gauge.(Appropriat e ext ension cor ds
ar e avail able.) Do not use mul tipl e cords.
D I n good condition. Cord insulat i on must
be int act wit h no cracks or deter i or ati on.
Plug connector s must be undamaged.
DO N OT use m ult iple co rds.


