


8
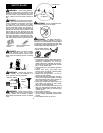
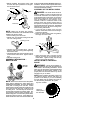
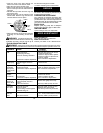
Choke
Primer Bulb
Starter
Handle
Choke
Primer Bulb
Starter
Handle
Muffle
r
COLD ENGINE STARTING (or warm
engine after running out of fuel)
S
Rest engine and shield on ground, support-
ing trimmer head off ground.
S
Move the ON/OFF switch to the ON posi-
tion.
S
Slowly press the primer bulb 6 times.
S
Move the choke lever t o FULL CHOKE
position.
S
Set t he throttle t r igger in the starting position
using the throttle lock feature. Keep throttle
trigger in the starting position until engine runs
smoothly.
S
Pull starter rope handle sharply 6 times.
S
Move choke lever to HALF CHOKE posi-
tion.
S
Pull starter rope handle no more t han 6
pulls, until engine runs.
S
Allow engine to run 10 seconds, then move
choke lever to OFF CHOKE position. Allow
unit to run for 3 0 more seconds at OFF
CHOKE before releasing throttle trigger
from the starting position. Release throttle
trigger by squeezing the trigger and then re-
leasing it.
STARTING A WARM ENGINE
S
Move the ON/OFF switch to the ON posi-
tion.
S
Move the choke lever to the OFF CHOKE
position.
S
Pull starter rope handle until engine runs.
S
If engine does not start in 5 pulls, follow in-
structions in STARTING ACOLD ENGINE.
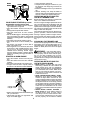
USING YOUR UNIT
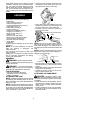
OPERATING POSITION
Control Handle
in Right Hand
S
Extend your left armand hold handlebar grip
with your left hand.
S
Hold throttle grip with your right hand with
finger on throttle trigger.
S
Keep unit below waist level.
S
Keep shoulder strap pad centered on your
left shoulder and danger sign centered on
your back.
S
Maintain full weight of tool on your l eft shoul-
der.
S
Without bending over, keep the blade or
trimmer headnear and parallel to theground
and not crowded into material being cut.
OPERATING INSTRUCTIONS FOR
USE WITH TRIMMER HEAD
Before trimming, bring engine to aspeed suffi-
cient to cut material to be trimmed.
Donot run engineat a higherspeed than neces-
sar y. The cutting line w ill cut ef fic ien tly wh en th e
engine is run at l ess than full throttle. At lower
speeds, there is less engine noise andvibration.
The cutting line will l ast longer and will be less
likely to “weld” onto the spool.
If the trimmer head does not turn when the en-
gine is in operation, make sure the drive shaft
housing is properly seated in engine shroud.
Always release the throttle trigger and allow
the engine toreturn toidle speed when notcut-
ting.
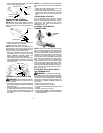
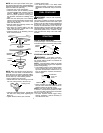
ADVANCING THE TRIMMER LINE
Advance line b ytapping the bottomof thecutting
head lightly on the ground while engine is run-
ning at full speed. The line limiter blade ( on un-
derside of shi eld) will cut the line to t he proper
length..
WARNING:
Use only 0.080” (2 mm)
diameter line. Other sizes of line will not ad-
vance properly and can cause serious injury.
Do not use other materials such a s wire,
string, rope, etc. Wire can break off during cut-
ting and become a dangerous missile that can
cause serious injury.
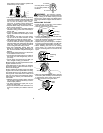
OPERATING INSTRUCTIONS FOR
USE WITH BRUSH BLADE
S
Blade Thrust
is a reaction t hat only occurs
when using a bladed uni t. This reaction can
cause serious injury such as amputation.
Carefully study this section. It is important that
you understand w hat causes bl ade thr ust,
how you can reduce the chance of its occur-
ring, and how you c anremain in control of unit
if blade thrust occurs.
S
WHA T CAUSES BLADE THRUST -- Blade
Thrust
can occur when the spinning blade
contacts an object that it does not cut. This
contact causes t he blade to stop for a ninstant
and thensuddenly m oveor “thr ust”awayfrom
the object that washit. The “thrusting”reaction
can beviolent enoughto causethe oper atorto
be propelled in any direction and lose control
of the unit. The uncontrolled uni t can cause
seriousinjuryif thebladecontacts theoperator
or others.
S
WHEN BLADE THRUST OCCURS --
Blade Thrust
can occur without warning if
the blade snags, stalls, or binds. This is
more likely to occur in areas where it is diffi-
cult to see the material being cut. By using
the unit p roperly, the occurrence of blade