


WARN ING: When re mov ing the cut -
ting blade for sharp en ing or re place -
ment, pro tect hands by us ing heavy
gloves or a rag to grasp the cut ting
blade.
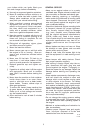
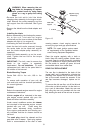
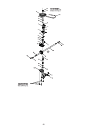
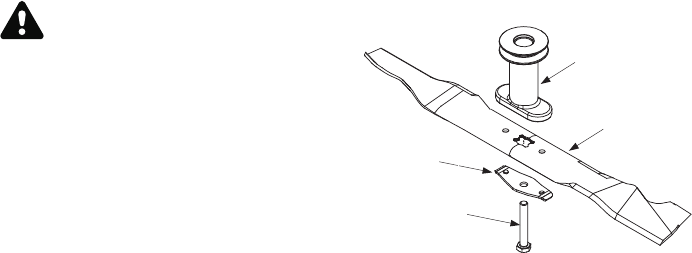
• Re move the bolt which hold the blade
adapter-pul ley as sem bly to the en gine crank -
shaft. Re move the pul ley as sem bly and the
bell sup port from the crank shaft. See Fig ure
13.
• Re move the blade from the blade adap tor and
pul ley.
Installing the blade
• Be fore re as sem bling the blade-pul ley as sem -
bly to the unit, lu bri cate the en gine
crank shaft and the in ner sur face of the blade
adapter with light oil (or en gine oil).
• Lu bri cating the bolt hole and hex bolt.
• In sert the hex bolt, ear lier re moved, through
the cen ter holes on the blade bell sup port
and the blade adapter-pul ley as sem bly re -
spec tively.
• In stall the blade as sem bly up on the crank -
shaft. Tighten the hex bolt to the torque
listed be low.
IM POR TANT: The bolt, used to se cure the
blade to the en gine, is es pe cially
heat-treated. Do not sub sti tute. To or der
re place ment bolt, re fer to the parts listed in
the mid dle of this man ual.
Blade Mount ing Torque
Cen ter Bolt: 450 in. lbs. min., 600 in. lbs.
max.
To en sure safe op er a tion of your unit, all
nuts and bolts must be checked pe ri od i cally
for cor rect tight ness.
ENGINE
Re fer to the sep a rate en gine man ual for en gine
main te nance in struc tions.
Main tain en gine oil as in structed in the sep a -
rate en gine man ual packed with your unit.
Read and fol low in struc tions care fully.
Un der nor mal con di tions ser vice air cleaner
as in structed in the sep a rate en gine man ual
packed with your unit. Clean ev ery few
hours un der ex tremely dusty con di tions.
Poor en gine per for mance and flood ing usu -
ally in di cates that the air cleaner should be
ser viced.
The spark plug should be cleaned and the
gap re set once a sea son. Spark plug re place -
ment is rec om mended at the start of each
mow ing sea son; check en gine man ual for
cor rect plug type and gap spec i fi ca tions.
NOTE: This spark ig ni tion sys tem meets
all re quire ments of the Ca na dian In ter fer -
ence-Causing Equip ment Reg u la tions.
Clean the en gine reg u larly with a cloth or
brush. Keep the cool ing sys tem (blower hous -
ing area) clean to per mit proper air cir cu la tion
which is es sen tial to en gine per for mance and
life. Be cer tain to re move all grass, dirt and
com bus ti ble de bris from muf fler area.
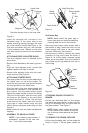
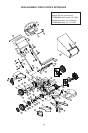
REAR FLAP REPLACEMENT
The rear flap is at tached to the back of the
mower deck, and is de signed to min i mize the
pos si bil ity that ob jects will be thrown from the
rear of the mower to ward the op er a tor. If the
rear flap be comes dam aged, re place as fol -
lows.
To re move the old rear flap, cut off the flat end
of the wire rod which se cures it to the deck us -
ing a pair of side-cut ters. At tach the new rear
flap us ing the new rod pro vided with the rear
flap, bend ing the ends of the rod over to se cure.
13
Figure 13
Blade
Blade Bell
Support
Adapter-Pulley
Assembly
Hex Bolt