


SECTION2: ASSEMBLINGYOURLOGSPLITTER
UnpackingfromCrate
• Pry top, sides, and ends off the crate. Set panels
aside to avoid tire puncture or personal injury.
• Remove and discard plastic bag that covers unit.
• Remove any loose parts if included with unit (i.e.,
operator's manual, etc.)
• Cut and remove straps which secure parts to
bottom of crate. Unbolt any remaining parts which
may be bolted to the bottom of the crate.
WARNING: Use extreme caution while
_b unpacking this machine. Some
components
are very heavy and will require extra people or
mechanical handling equipment to move.
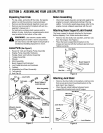
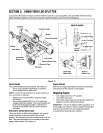
LooseParts(SeeFigure1)
1. Reservoir Tank and Engine-Pump Assembly
2. Engine-Pump Assembly Hardware
3. Wedge, Beam and Cylinder Assembly
4. Tongue Assembly
5. Wheels
6. Hitch Assembly
7. Beam Support/Latch Bracket
8. Log Cradle Brackets and Hardware
9. Fenders
10. Adjustable Jack Stand Assembly
11. Tail Light Kit
12. Hub Cap (2)
Kit -q Beam Support/
Latch Bracket
Hitch Assembly
Wheel & Fender
Assembly
Assembly
Jack Stand
Figure 1
BeforeAssembling
• Disconnect spark plug wire and ground against the
engine to prevent unintended starting of the log
splitter. To locate the spark plug, please refer to the
engine manual, shipped separately with the unit.
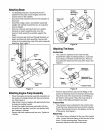
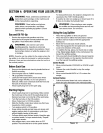
AttachingBeamSupport/LatchBracket
The beam support is already attached to the tongue
before shipping. If not, follow instructions below:
• Remove two hex bolts, lock washers, and hex nuts
from the tongue. See Figure 2.
• Place the beam support/latch bracket on the
tongue and secure with the hardware just removed.
Tighten securely.
kh_ Beam Support/
Latch Bracket
v°C
as er_
Hex Nut
Figure 2
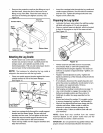
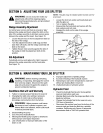
AttachingJackStand
• Remove four hex bolts, lock washers, and hex nuts
that secure jack stand mounting brackets to the
jack stand. See Figure 3.
• Place the jack stand halfway between beam
support/latch bracket and end of tongue.
Hex Bolts_
Mounting_ ___
Brackets
Lock Washer
Figure 3