


13
• Do not mow at high ground speed, especially if a mulch kit or grass collector is installed.
• For best results it is recommended that the first two laps be cut with the discharge thrown towards the center.
After the first two laps, reverse the direction to throw the discharge to the outside for the balance of cutting. This
will give a better appearance to the lawn.
• Do not cut the grass too short. Short grass invites weed growth and yellows quickly in dry weather.
• Mowing should always be done with the engine at full throttle.
• Under heavier conditions it may be necessary to go back over the cut area a second time to get a clean cut.
• Do NOT attempt to mow heavy brush and weeds and extremely tall grass. Your tractor is designed to mow
lawns, NOT clear brush.
• Keep the blades sharp and replace the blades when worn. Refer to Cutting Blades on page 19 of this manual for
proper blade sharpening instructions.
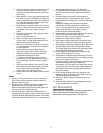
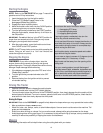
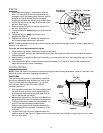
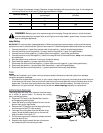
Side-Discharge
To operate the cutting deck for side-discharge of grass
clippings only, remove the mulch plug by unthreading the
plastic wing nut which fastens it to the cutting deck. This
will allow the clippings to discharge out the side. See
Figure 5.
SECTION 5: MAKING ADJUSTMENTS
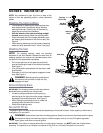
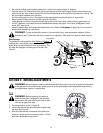
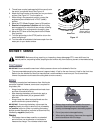
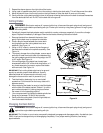
Seat
1. Flip the seat up as shown in Figure 6.
2. Loosen the two seat adjustment knobs located under
the seat. See Figure 6.
3. Slide the seat forward or rearward, then tighten the
knobs to lock the seat at the desired position. Put the
seat down to the operating position.
WARNING: To help avoid blade contact or a thrown object injury, keep bystanders, helpers, children
and pets at least 75 feet from the machine while it is in operation. Stop machine if anyone enters the area.
WARNING: Never attempt to make any adjustments while the engine is running, except where specified
in the operator’s manual.Disconnect spark plug wire(s) and ground against the engine before performing
any adjustments, repairs or maintenance.
WARNING: Before operating this machine,
make sure the seat is engaged in the seat stop,
stand behind the machine and pull back on seat
until fully engaged into stop.
Wing Nut
Bell
Washer
Figure 5
Figure 6
Seat
Knob
(if equipped)