


Operation
5
11
Starting Motor
WARNING: Avoid accidental starting. Make sure
you are in the operating position behind the snow
thrower when using it. To avoid serious injury, the
operator and unit should be in a stable position
while starting.
Connecting to an Electrical Power Source
WARNING: This snow thrower should be operated
on a 15 or 20 AMP circuit. If you experience difficulty
in starting with a standard 15 AMP fuse or circuit
breaker, contact an authorized service dealer. Do not
use a higher rated fuse or breaker without
consulting your power company.
NOTE: Connect your extension cord to the snow thrower as
instructed in the Assembly & Set-Up section prior to plugging
your extension cord into an electrical outlet.
1. Plug your extension cord into any convenient (indoor or
outdoor) 120-volt, 60 hertz AC outlet or receptacle. Your
snow thrower will operate satisfactorily on a circuit with a
15 ampere breaker.
NOTE: To avoid tripping circuit breakers, select an outlet
on a circuit that is not overloaded. Do NOT select an outlet
that is on a circuit hosting appliances such as a refrigerator.
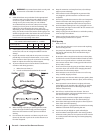
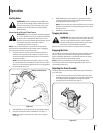
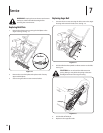
2. Insert key. Refer to Fig. 5-1.
3. Stand behind the snow thrower in the operating position.
4. Press the red starter button and hold it in. See Fig. 5-1.
NOTE: Starting the snow thrower’s motor also engages
the auger.
5. While holding the starter button in, squeeze the motor
control lever against the upper handle to start the motor
and engage the auger. See Fig. 5-1.
NOTE: The snow thrower’s motor will NOT start if you fail to
hold the starter button in while pivoting the motor control
handle upward.
6. Release the red starter button.
Stopping the Motor
WARNING: The auger continues to rotate for a few
seconds after the motor is shut off. If motor does not
come to a stop when the motor control handle is
released, unplug the snow thrower from the outlet,
and contact an authorized service dealer.
Release the motor control lever to stop the motor and auger.
Engaging the Drive
Lift up slightly on the handle to allow the rubber paddles on the
auger to contact the pavement and propel the snow thrower
forward. Pushing downward on the handle will raise the auger
off the ground and stop the forward motion.
NOTE: Excessive upward pressure on the handle will result
in premature wear on the rubber auger blades which are not
covered by the warranty.
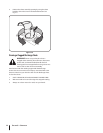
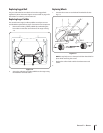
Adjusting the Chute Assembly
The pitch of the chute assembly controls the angle at which the
snow is thrown.
1. Loosen the wing knob found on the left side of the chute
assembly and pivot the upper chute upward or downward
to the desired pitch. Retighten the wing knob before
operating the snow thrower. See Fig. 5-2.
Motor Control Lever
Starter Button
Key
Figure 5-1
Figure 5-2