


9
3
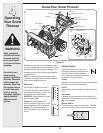
Setting Up
Your Snow
Thrower
WARNING
Never use your hands
to clean snow and
ice from the chute
assembly or auger
housing.
IMPORTANT
If the tire pressure is not
equal in both tires, the unit
may not travel in a straight
path and the shave plate
may wear unevenly.
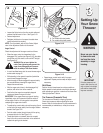
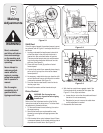
A
B
Figure 3-11
• Repeataugercontroltesttoverifyforproper
adjustment. Repeat previous steps to adjust more, if
necessary.
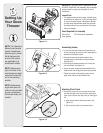
Skid Shoes
Position the skid shoes based on surface conditions.
Adjust upward for hard-packed snow. Adjust downward
when operating on gravel or crushed rock surfaces. See
“Making Adjustment” Section.
Tire Pressure (Pneumatic Tires)
The tires are over-inflated for shipping purposes.
Check the tire pressure before operating the snow
thrower. Refer to the tire side wall for tire manufacturer’s
recommended psi and deflate (or inflate) the tires as
necessary.
• LoosentheNylocknutonthedrivecontrolcableand
unthread the cable one full turn. See Figure 3-13.
• Recheckadjustment.
• RetightentheNylocknuttosecurethecablewhen
correct adjustment is reached.
NOTE: For more details, refer to Drive Control Adjust-
ment in the Adjustment Section of this manual.
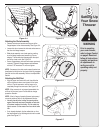
Auger Control
Check the adjustment of the auger control as follows:
• Whentheaugercontrolisreleasedandinthe
disengaged “up” position (see Figure 3-11B), the cable
should have very little slack, but should NOT be tight.
See Figure 3-12.
WARNING:Do not over-tighten the
cable. Over-tightening may prevent the
auger from disengaging and compro-
mise the safety of the snow thrower.
• Inawell-ventilatedarea,startthesnowthrowerengine
as instructed on page 12.
• Whilestandingintheoperator’sposition(behindthe
snow thrower) engage the auger.
• Allowtheaugertoremainengagedforapproximately
ten seconds before releasing the auger control.
Repeat this several times.
• Withtheaugercontrolleverinthedisengaged“up”
position, walk to the front of the machine.
• Confirmthattheaugerhascompletelystopped
rotating and shows no signs of motion.
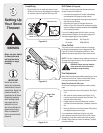
IMPORTANT: If the auger shows any signs of rotating,
immediately return to the operator’s position and shut
off the engine. Wait for all moving parts to stop before
readjusting the auger control cable.
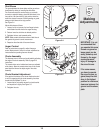
• Toreadjustthecontrolcable,unhookthespring(found
on the end of the auger cable) from the auger actuator
bracket. See Figure 3-12.
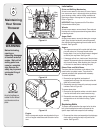
• Pushthecablecouplerthroughtheendofthespring
to expose the lock nut. See Figure 3-13.
• ThreadtheNylocknutoutward(downthecoupler)
three full turns to provide more slack in the cable and
reattach the spring to the bracket.
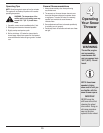
Figure 3-13
Figure 3-12
Drive
Auger
A
B
A - For models with steel panels.
B - For models with plastic panels.