


21
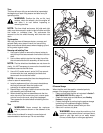
Tines
The tines will wear with use and should be inspected at
the beginning of each tilling season and after every 30
operating hours.
WARNING: Position the tiller on flat, level
surface, chock the wheels, shut the engine off
and allow it to cool before inspecting or
removing the tines.
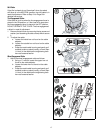
NOTE: The tine shield end-covers (left side and right
side) must be removed in order to take off either a single
tine holder or individual tines. The end-covers are
secured to the tine shield housing with three hex nuts
each.
Tine Inspection
With use, the tines will become shorter, narrower and
pointed. Badly worn tines will result in a loss of tilling
depth and reduced effectiveness when chopping up and
turning under organic matter.
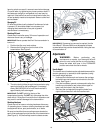
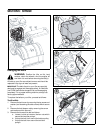
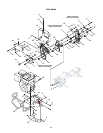
Removing and Installing Tines
1. Use a pair of pliers to remove the internal cotter pin
and clevis pin that secures each tine holder to the tine
shaft.
2. Use a rubber mallet to tap the tine holder free of the
tine axle and slide the tine assembly off the tine axle.
NOTE: The tine shield and handlebar are not shown for
clarity. It is NOT necessary to remove the tine shield and
handlebar to service the tiller tines.
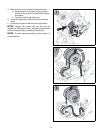
3. Use a 9/16" socket wrench, and a 9/16" box wrench
to remove the hex nuts, washer(s) and bolts that
secure each tine to the tine holder.
NOTE: It is recommended that tines be changed one at
a time for ease in reassembling
4. Install a replacement tine in the exact orientation as
the tine just removed. Note the location and
orientation of washers were applicable.
5. Repeat Steps 1-through-4 above to remove the other
tine assembly and individual tines.
6. When reinstalling the tine assemblies onto the tine
axles, be sure to first remove any rust, uneven spots
or burrs from the tine axle, using fine sandpaper.
Then grease the tine axle before reinstalling the tine
assemblies.
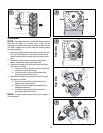
Tires
WARNING: Never exceed the maximum
inflation pressure shown on the sidewall of the
tire.
Refer to the tire sidewall for exact tire manufacturer’s
recommended or maximum psi. Do not overinflate.
Off-season Storage
When the tiller won’t be used for extended periods,
prepare it for storage as follows:
• Clean and lubricate the tiller as instructed in Section 7:
MAINTAINING YOUR TILLER on page 15.
• Check for loose parts and hardware (see Checking
Hardware on page 16).
• Protect the engine by performing the engine storage
instructions in the separate Briggs & Stratton
Operator/Owner Manual packed with your tiller.
• Store unit in a clean, dry area.
WARNING: Never store the machine or fuel
container indoors where there is an open flame,
spark or pilot light such as on water heater,
furnace, clothes dryer or other gas appliance.
3-6
1-2