


16
Ignoring a leak can result in severe transmission damage.
If a cover leaks, try tightening any loose screws or bolts. If
the fasteners are tight, a new gasket or oil seal may be
required. If the leak is from around a shaft and oil seal, the
oil seal probably needs to be replaced. See an authorized
service dealer.
Changing Oil
Oil level should be visually checked if evidence of a leak
is present. Oil should be added in such cases, but
changing the transmission oil as part of general
maintenance is unnecessary
Checking Oil Level
Check the oil level after every 30 hours of operation and
whenever there is any oil leakage.
IMPORTANT:
Never operate the tiller if the transmission is
low on oil.
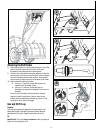
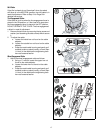
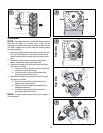
1. Position the tiller on a level surface.
2. Remove the fill plug found on the front of the
transmission. See Figure 2.
Figure 2
3. The drive shaft (visible through the transmission plug
opening) should be half-submerged. If necessary,
slowly add SAE 85W140 oil until the drive shaft is
approximately half-submerged.
IMPORTANT:
Do NOT add oil to the top of the
transmission housing. Do NOT fully submerge the drive
shaft with oil. Doing so will not allow for oil expansion and
may result in serious damage to the transmission .
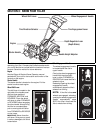
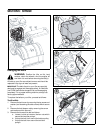
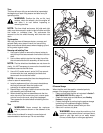
Checking Hardware
Check the unit for loose or missing hardware after every
10 operating hours. Loose or missing hardware can lead
to equipment failure, poor performance, or oil leaks.
Be sure to check the three mounting screws located on
each of two end caps found at the rear of the transmission
(See Figure 3). Lift the tine flap to service those screws.
Figure 3
IMPORTANT:
If loosened or removed, a sealant (Loctite
Ultra Black™ Silicone 5900) must be applied to these
screws before they can be reused without risking the loss
of transmission oil.
Adjustments
WARNING: Before performing any
maintenance or repairs, turn the engine off and
allow it to cool, move the tiller to a level surface,
place the wheel shift lever in the FORWARD
position and chock the tiller’s wheels.
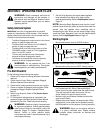
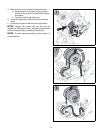
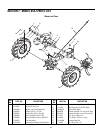
Handle Height
The handle mount bracket can be adjusted downward (for
shorter operators) or upward (for taller operators) using
the handle height adjuster.
• Unthread the handle crank and remove the carriage
bolt which secures handle mount bracket to the tiller
frame. See Figure 4.
• Pivot the handlebar upward or downward to align the
handle mount bracket’s rear holes (either upper or
lower) with the holes in the tiller frame.
• Re-insert the carriage bolt through the holes from
right to left and secure it with the handle crank.
Figure 4