


9
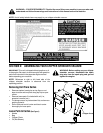
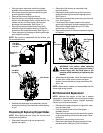
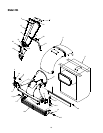
shredding. After material has been shredded by the
blades on the impeller assembly, it will be discharged
into catcher bag. Do not attempt to shred or chip any
material other than vegetation found in a normal yard
(i.e. branches, leaves, twigs, etc.) Avoid fibrous plants
such as tomato vines until they are thoroughly dried
out. Materials such as stalks or heavy branches up to 3”
in diameter may be fed into the chipper chute.
See Figure 9.
WARNING: Do not attempt to shred, chip,
or vacuum any material larger than
specified on the machine or in this
manual. Personal injury or damage to the
machine could result.
IMPORTANT:
The flail screen is located inside the
housing in the discharge area. If the flail screen
becomes clogged, remove and clean as instructed in
SECTION 6: MAINTAINING YOUR CHIPPER
SHREDDER VACUUM. For best performance, it is also
important to keep the chipper blade sharp.
Figure 9
Tire Pressure (Pneumatic Tires Only)
WARNING: Maximum tire pressure under
any circumstance is 30 psi. Equal tire
pressure should be maintained at all
times.
SECTION 5: ADJUSTING YOUR CHIPPER SHREDDER VACUUM
WARNING: Do not at any time make any
adjustments without first stopping engine,
disconnecting spark plug wire, and
grounding it against the engine.
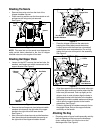
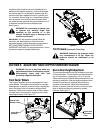
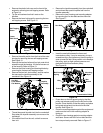
Front Caster Wheels
This chipper shredder vacuum is equipped with front
caster wheels. The casters can be locked in a straight
ahead position or position to swivel freely. Lift and place
pins in the larger holes for locked or straight ahead
operation. Place pins in smaller holes to allow casters
to rotate freely. Lock wheels in straight position when
operating on slopes. See Figure 10.
Figure 10
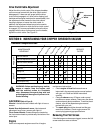
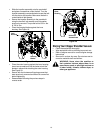
Nozzle Door Height Adjustment
The nozzle adjustment levers are located on each side
of the nozzle door. The nozzle door can be adjusted to
any of five positions, ranging from 1/2” to 3” ground
clearance that will provide the best performance for the
operating conditions. Slide the height adjustment lever
forward or backward for adjusting the nozzle door
upwards or downwards. Height must be adjusted
equally. In general, raise the nozzle to vacuum a thick
layer of leaves and lower the nozzle for smooth
surfaces. See Figure 11.
Figure 11
Smaller Hole
(Rotate Freely)
Larger Hole
(Locked)
Nozzle Door
Adjustment
Lever