


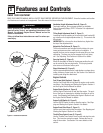
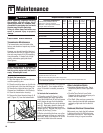
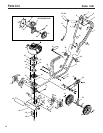

7
PRE-START PREPARATION
Before starting the engine, perform the
following checks and services:
1. Disconnect the spark plug wire from
the spark plug.
2. Move the engine On/Off switch to the
OFF position.
3. Check that all wires and cables are
properly and securely connected.
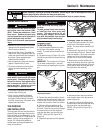
4. Check the six plastic cable ties (J,
Figure 2). Be sure that cables and ties are
positioned as shown. Cables must not be
kinked or jammed in the handlebar.
5. Adjust handlebar height to desired po-
sition (see Section 2).
6. Check hardware for tightness.
7. Check engine oil level (see Engine
Owner’s Manual).
8. Check the air filter (see Engine Owner’s
Manual).
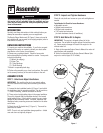
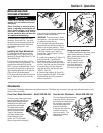
9. Adjust the tilling depth as follows:
a. Loosen tilling depth adjustment
knob (A, Figure 3).
b. Move wheel bracket (B, Figure 3) up
in relation to height adjustment bar
(C). Moving bracket upward results
in shallower tilling, which is recom-
mended for initial use.
IMPORTANT: Do not move the wheel
bracket any higher than the top of
the adjustment bar.
c. Retighten the depth adjustment
knob.
10. Reconnect the spark plug wire.
11. Add gasoline to the fuel tank.
IMPORTANT: Read the separate Engine
Owner’s Manual before starting the
engine. Never use stale or contaminated
gasoline or oil/gas mix. The engine must
be stopped and cool before adding gas.
Fill the fuel tank with unleaded gasoline
(with a pump octane rating of 86 or
higher) according to the directions in the
separate Engine Owner’s Manual. The
engine is a vertical type, GX 31 model.
STOPPING AND
STARTING THE ENGINE
Stopping the Engine
To stop the engine, move the On/Off
Switch (A, Figure 2) to the OFF position.
NOTE: The On/Off switch wire must be
securely connected at both ends. Check
regularly to ensure that the switch wire is
securely connected to the switch and the
engine.
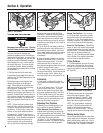
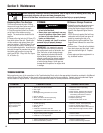
Starting the Engine
NOTE: Do not squeeze Engine
Throttle/Tines Control Lever (G, Figure 2)
when starting engine.
1. Move the On/Off Switch (A, Figure 2)
to the ON position.
2. To start a cold engine, move the choke
lever (C, Figure 5) to the CLOSED posi-
tion. To restart a warm engine, leave the
choke lever in the OPEN position.
3. To start a cold engine, or after refueling
an engine that has run out of fuel, press
the priming bulb (A, Figure 4) repeatedly
until fuel can be seen in the clear-plastic
fuel-return tube (B). To restart a warm
engine, it is not necessary to press the
priming bulb.
4. Move to the starting position (Figure
6), keeping your feet positioned safely
away from the tines.
5. Place one hand on the upper handlebar
to stabilize the machine. Use the other
hand to pull the recoil start rope lightly
until you feel resistance, then pull briskly.
Let the rope rewind slowly after each pull.
NOTE: An alternate stabiliza-
tion method is to stand in
the starting position
(Figure 6), but place one
hand on the carrying
handle while pulling the
starter rope with the
other hand.
6. If the choke lever
was moved to the
CLOSED position to
start the engine, grad-
ually move it to the
OPEN position as the
engine warms up.
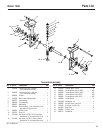
Figure 3
A
B
C
Do not squeeze the Throttle/Tines Con-
trol Lever while starting engine.
Tines may propel the machine forward if
the engine speed is advanced from idle.
Failure to comply can result in personal
injury or property damage.
WARNING
Operation
4
Section
Figure 6
Before operating the unit, carefully read
and understand all safety, control and
operating instructions in this Manual,
the separate Engine Owner’s Manual
and the decals on the machine.
Failure to follow these instructions can
result in serious personal injury.
WARNING
Figure 5: Choke lever.
Figure 4: Primer bulb (A) and fuel-return
tube (B).
A
B
GASOLINE IS HIGHLY FLAMMABLE AND
ITS VAPORS ARE EXPLOSIVE.
Follow the gasoline safety rules in this
Manual (Section 1) and in the separate
Engine Owner’s Manual.
Failure to follow gasoline safety instruc-
tions can result in serious personal
injury and property damage.
DANGER
C
Close
Open