


12
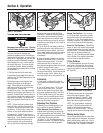
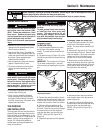
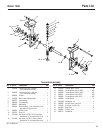
Replacing Worn Tine Sections
The tines are excessively worn if tilling
takes much longer than before and soil is
not being mixed thoroughly enough.
1. Prop the machine forward so it rests
on the front of the tubular carrying
handle. The work surface should be flat
and firm.
2. Remove the ring lock pin (A, Figure 12)
from both sides of the unit. Remove the
old tine sections and replace them with
new tine sections. Refer to Figure 12 and
the tine position shown in the Parts List
for tine positioning details. Insert the ring
lock pins through the rounded side of the
tine shafts and snap the ring over the
shaft (see DETAIL - Ring Lock Pin, Figure
10, in Section 4).
STORAGE
IMPORTANT: It is important to prevent
gum deposits from forming in essential
fuel system parts such as carburetor, fuel
filter, fuel hose, or tank during storage.
Also, experience indicates that alcohol-
blended fuels (called gasohol or using
ethanol or methanol) can attract moisture
which leads to separation and formation
of acids during storage. Acidic gas can
damage the fuel system of an engine while
in storage.
Off-Season Storage Procedure
• Protect the engine and perform recom-
mended engine maintenance by fol-
lowing the engine storage instructions
found in the separate Engine Owner’s
Manual.
NOTE: Be sure to protect the fuel lines,
carburetor and fuel tank from gum de-
posits by removing the fuel or by
treating the fuel with a stabilizer. See
Engine Owner’s Manual for more infor-
mation.
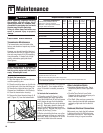
• Remove tines. Clean all soil and debris
from dust covers and tine shaft. Lubri-
cate tine shaft with light oil. Replace
tines.
• Cover engine and store equipment in a
dry, sheltered location.
• Never store your equipment when there
is fuel in the fuel tank.
• Never place your equipment near any
source of sparks or open flame (such
as from a hot water heater, a space
heater or clothes dryer).
Failure to comply can result in serious
personal injury or property damage.
WARNING
Before inspecting, cleaning or servicing the machine, shut off engine, wait for moving parts to stop, dis-
connect spark plug wire and move wire away from spark plug.
Failure to follow these instructions can result in serious personal injury or property damage.
WARNING
TROUBLESHOOTING
Before performing any of the corrections in this Troubleshooting Chart, refer to the appropriate information contained in this Manual
and the Engine Owner’s Manual for the correct safety precautions and servicing procedures. Contact your local authorized Engine
Service Dealer for engine service. Contact your local authorized dealer for service problems with the machine.
Engine does not start. 1. Spark plug wire disconnected. 1. Reconnect wire to spark plug.
2. Out of gas. 2. Check fuel tank.
3. Stale gas. 3. Drain old gas. Replace with fresh gas.
4. Priming/Choking procedure not correct. 4. Refer to Priming/Choking procedure
and starting instructions in manual.
5. Dirty air filter(s). 5. Clean or replace air filters.
6. Worn, corroded or broken spark plug. 6. Replace spark plug.
7. On/Off Switch in OFF position. 7. Move On/Off Switch to ON.
Engine runs poorly or 1. Fouled spark plug. 1. Remove, inspect, clean spark plug.
has low power under 2. Dirty air filter(s). 2. Clean or replace dirty air filters.
tilling conditions. 3. Stale gas. 3. Drain old fuel and replace with fresh fuel.
4. Carburetor malfunction/fuel filter 4. See authorized engine service dealer.
clogged/ignition malfunction/valves stuck, etc.
Engine overheats. 1. Engine cooling system clogged. 1. Remove debris.
2. Carburetor out of adjustment. 2. See an authorized engine dealer.
Tines stop rotating. 1. Object wedged between tines and hood. 1. Remove wedged object.
2. Internal transmission problem. 2. See an authorized engine dealer.
Section 5: Maintenance
PROBLEM POSSIBLE CAUSE CORRECTIVE ACTION