


10
• Repeat Auger Control Test to verify proper
adjustment has been achieved. Repeat the
previous steps to provide more slack in the cable, in
necessary.
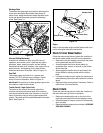
To Engage Wheel Drive
• With the engine running near top speed, move the
shift lever into one of the six FORWARD positions
or two REVERSE positions. Select a speed
appropriate for the snow conditions.
NOTE: Use slower speeds in heavy conditions and
until you are familiar and comfortable with the operation
of the snow thrower.
• Squeeze the traction control against the right
handle and the snow thrower will move. Release it
and the drive motion will stop.
IMPORTANT:
NEVER move the shift lever without first
releasing the traction control. Doing so will cause
premature wear to the drive system’s friction wheel.
Wheel Steering Controls
The left and right wheel steering controls are located on
the underside of the handles.
• With the traction control engaged, squeeze the
right wheel steering control to assist in turning right;
squeeze the left control to assist in turning left.
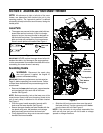
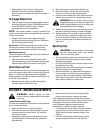
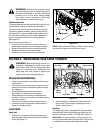
Chute Clean-out Tool
The chute clean-out tool is conveniently fastened to the
rear of the auger housing with a mounting clip (Refer to
Figure 7). If the discharge chute becomes clogged
during operation, proceed as follows to safely clean the
chute and chute opening:
1. Release both the Auger Control Lever and the
Traction/Auger Control Lock Lever.
2. Stop the engine by removing the ignition key.
3. Remove the clean-out tool from the clip which
secures it to the rear of the auger housing.
4. Use the shovel-shaped end of the clean-out tool to
remove any snow and ice in the discharge chute.
WARNING: Never use your hand to clear a
clogged discharge chute. Shut off engine and
remain behind handles until all moving parts
have stopped before unclogging.
5. Refasten the clean-out tool to the mounting clip on
the rear of the auger housing, re-start the engine.
6. While standing in the operator’s position (behind
the snow thrower), engage the auger clutch lever
for a few seconds to clear any remaining snow or
ice from the discharge chute before continuing to
clear snow.
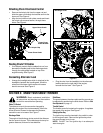
Operating Tips
WARNING: The temperature of the muffler
and the surrounding areas may exceed
150°F. Avoid these areas.
• Allow the engine to warm up for a few minutes. The
engine will not develop full power until it reaches
operating temperature.
• For the most efficient snow removal, remove snow
immediately after it falls.
• Discharge the snow downwind whenever possible.
• Slightly overlap each previous path.
• Set the skid shoes 1/4" below the shave plate for
normal usage. The skid shoes may be adjusted
upward (to lower the shave plate) for hard-packed
snow. Adjust downward (to raise the shave plate)
when using on gravel or crushed rock.
SECTION 5: MAKING ADJUSTMENTS
WARNING: NEVER attempt to clean
chute or make any adjustments while engine
is running.
Traction Control and Shift Lever
To check the adjustment of the traction control and shift
lever, proceed as follows:
• Move the shift lever into sixth (6) position.
• With the traction control released, push the snow
thrower forward, then pull it back. The machine
should move freely.
• Engage the traction control and attempt to move
the machine both forward and back, resistance
should be felt.
• Move the shift lever into the fast reverse (R2)
position and repeat the previous two steps.
If you experienced resistance rolling the unit, either
when repositioning the shift lever from 6 to R2 or when
attempting to move the machine with the traction
control released, adjust the traction control
immediately. To adjust, proceed as follows:
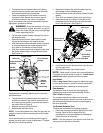
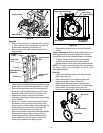
• To readjust the control cable, unhook the traction
spring (found on the end of the traction control
cable) from the traction actuator bracket. See
Figure 8.
• Push the cable coupler through the end of the
spring to expose the lock nut. See Figure 9.