


Servicing Pilot Valve
WARNING! Never stand or lean over the sprinkler while the irrigation system is being filled, during manual or
automatic operation or when performing sprinkler service procedures. Direct contact with irrigation spray, a failed
or improperly installed sprinkler connection or sprinkler components forcibly ejected upward under pressure can cause
serious injury.
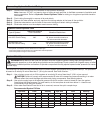
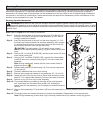
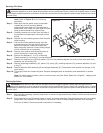
Note: Refer to Figure 10 for the following
procedure.
Step 1 – Make sure that the water supply to sprinkler
is positively shut off and any residual
pressure has been bled off. If the sprinkler is
pressurized, main valve will open when the pilot
valve is disconnected from control tube.
Step 2 – Carefully remove turf and soil from the side of
the sprinkler to expose pilot valve and control
tubing.
Step 3 – Remove the two retaining screws from the pilot
valve housing.
Step 4 – Pull the pilot valve assembly away from the
sprinkler body and cut the control tubing just
below tube retainer. Unless pilot valve has
been previously removed, control tubing length
will be sufficient for re-connection.
Step 5 – Remove tube retainer and remaining piece of
control tubing from valve body fitting.
Step 6 – Remove the solenoid (1, 2 or 3) or Normally
Closed actuator (4) by turning it counterclockwise.
Step 7 – Remove the retaining nut (18) and washer (17) from the pressure adjuster (11) and pull the pilot valve body
assembly out of housing (16).
Step 8 – Remove diaphragm assembly (15), piston (14), spring (13), traveling adjuster (12), pressure adjuster (11) and
o-ring (7).
Step 9 – Remove selector shaft assembly (9) and plunger assembly (5). (The selector shaft retains the plunger in the
valve body.)
Step 10 – Thoroughly clean and inspect all parts. Replace damaged parts as necessary and reassemble in reverse
order.
Note: For service part numbers, refer to www.toro.com and click Parts. Select the “Irrigation” category and
search for “Pilot Valves”.
Flushing Sprinklers
WARNING! Never stand or lean over the sprinkler while the irrigation system is being filled, during manual or
automatic operation or when performing sprinkler service procedures. Direct contact with irrigation spray, a failed
or improperly installed sprinkler connection or sprinkler components forcibly ejected upward under pressure can cause
serious injury.
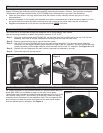
Step 1 – With sprinkler operating, carefully step down on center of cap several times. Water will flow around riser and
flush out debris.
Step 2 – Cycle sprinkler on and off several times to check for proper retraction. Cap should be even with top of body
flange when fully retracted. If riser sticks in up position, check for debris lodged between riser and body.
Flush out all debris. Remove sprinkler mechanism if necessary.
2
1
3
5
7
6
4
8
9
16
17
18
11
12
13
14
15
10
Figure 10