


unsafe operating condition. Contact an Authorized
Service Dealer.
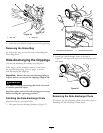
Recycling the Clippings
This machine comes from the factory ready to recycle
grass and leaf clippings back into the lawn. To prepare
the machine to recycle:
• If the side-discharge chute is on the mower, remove
it and lower the side-discharge deector ; refer
to
Removing the Side-discharge Chute (page 14).
• If the grass bag is on the machine, remove it; refer
to (page 9).
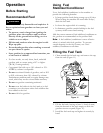
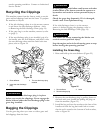
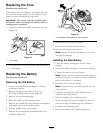
• If the rear-discharge plug is not installed, grip it by
the handle, raise the rear deector, and insert it into
the rear-discharge chute until the latch locks into
place; refer to
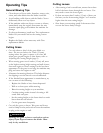
Figure 24.
1
2
G016490
3
Figure 24
1. Rear deector
3. The rear-discharge plug
installed
2. Insert the rear-discharge
plug
WARNING
Ensure that the rear-discharge plug is in place
before you recycle the clippings. Never engage the
blades without either the rear-discharge plug or the
grass bag installed.
Bagging the Clippings
Use the grass bag when you want to collect grass and
leaf clippings from the lawn.
WARNING
A worn grass bag could allow small stones and other
similar debris to be thrown toward the operator or
bystanders and result in serious personal injury or
death.
Check the grass bag frequently. If it is damaged,
install a new Toro replacement bag.
If the side-discharge chute is on the mower,
remove it before bagging the clippings; refer to
Removing the Side-discharge Chute (page 14).
WARNING
The blades are sharp; contacting the blades can
result in serious personal injury.
Stop the engine and wait for all moving parts to stop
before leaving the operating position.
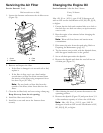
Installing the Grass Bag
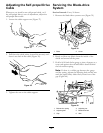
1. Raise and hold up the rear deector (Figure 25).
1
2
G017408
3
Figure 25
1. Rear deector
3. Latch
2. Rear-discharge plug
2. Remove the rear-discharge plug by pulling down on
the latch with your thumb and pulling the plug out
from the machine (Figure 25).
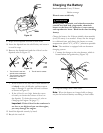
3. Install the bag rod into the notches at the base of the
handle and rock the bag back and forth to ensure
that the rod is seated at the bottom of both notches;
refer to Figure 26.
13