


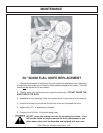

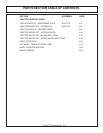
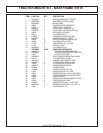

Side & Rear flail Maintenance Section 4-28
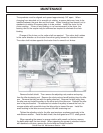
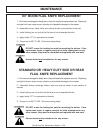
MAINTENANCE
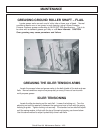
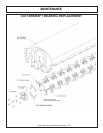
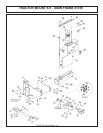
CUTTERSHAFT BEARING REPLACEMENT
1 – Remove existing cuttershaft, bearings and string guards.
2 – Make sure that the end knives on each end of the cuttershaft are orientated as
shown.
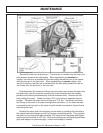
3 – Apply anti-seize on cuttershaft as shown on next page.
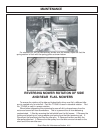
4 – Install non-drive side bearing first.
5 – Install the top of the string guard on the non-drive side first. Use loctite-271 or
equvalent and torque (95 ft-lb or 104ft-lb if you use an extension).
6 – Install the bearing and top string guard on the drive side.
7 – Center the cuttershaft between the string guards. Use loctite-271 or equivalent and
torque (95ft-lb or 104ft-lb if you use an extension) the top string guard on the drive side.
8 – Install, use loctite-271 or equivalent, and torque (95ft-lb or 104ft-lb if you use an
extension) the bottom string guard on both sides.
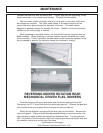
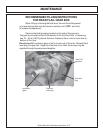
9 – Make sure the cuttershaft is centered. On the non-drive side, tighten one set-screw
in the bearing onto the cuttershaft.
10 – Remove the other set-screw and drill a 5/16” hole into the cuttershaft 3/16” deep
through the hole in the bearing. BE CAREFULL NOT TO DAMAGE THE THREADS IN
THE BEARING HOLE.
11 – Replace the set-screw in the bearing, use loctite-271 or equivalent, and tighten
onto the cuttershaft through the new hole.
12 – Remove the other set-screw and repeat the drilling procedure (Step 10). Replace
the set screw as stated in Step 11.
13 – Repeat steps 9 through 12 on the drive side.
14 – Grease both bearings properly.