


13
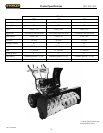
30SS, 36SS, 45SS
Rev: 12/21/2011
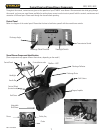
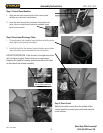
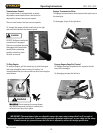
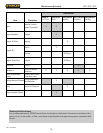
Step 9: Skid Shoes
1. Skid shoes are stored in the hardware bag for shipping.
2. Remove from hardware bag, and install skid shoes using the
provided fasteners
3. Insert the fasteners so the flat head of the carriage bolt is on
the outside of the main housing.
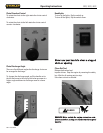
CAUTION: Check the skids to ensure that the auger does
not contact the paved or gravel surface. Adjust skids as
necessary to make up for wear on the snow blower.
1. Check the tire pressure to ensure the tires are properly
inflated.
2. Move skid shoes up and down to the desired position based
on the surface texture.
x If the surface is rougher adjust the skid shoes lower.
x If the surfaces is smoother adjust the skid shoes higher.
Firmly tighten the nuts that secure both skids to the auger
sides.
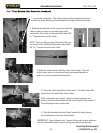
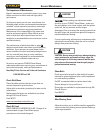
Step 8: Drift Cutters (if desired)
1. The drift cutters are attached to the main housing in
the stored position.
2. Remove the two bolts on each drift cutter.
3. Reattach the drift cutters in the operating position.
4. Replace bolts and secure tightly.
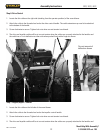
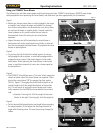
Step 11: Filling Oil and Gasoline
1. Fill the engine with SAE 5W-30 engine oil. Fill the engine
with 1.2 to 1.5 quarts of oil. Fill up to the full level mark on
the dip stick.
2. Check that the fuel filter is clean and fill the tank with
unleaded gasoline.
DANGER: GASOLINE IS HIGHLY FLAMMABLE AND
EXPLOSIVE.
Do not add fuel while the engine is
running or is hot. Keep open flames, sparks, and heat
away from the fuel and store fuel in containers
specifically designed for that purpose. A
ADD FUEL
OUTDOORS ONLY. IF THE FUEL IS SPILLED, DO NOT
START THE ENGINE.
Manually push the snow blower
away from the spill and wipe up immediately.
DANGER
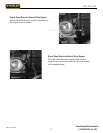
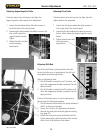
Step 10: Headlight
1. Attach the upper set of handlebars with the control panel
mounted.
2. Connect the headlight cable to the plastic connecter that is
coming from the snow blower.
3. Insert headlight by clipping top tabs under the control panel and
squeezing base to snap housing into place.
Assembly Instructions
Need Help With Assembly?
1-919-550-3221 ext. 158