


21
Installation
GB
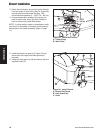
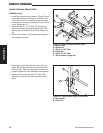
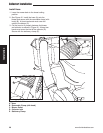
Remove the Rear Engine Shield
(IS3100Z with 4-Tube Rear Bumper)
1. If the engine is hot, allow sufficient time for the
muffler to cool to prevent a burn injury during
installation.
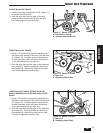
2. Remove the rear engine shield (C, Figure 35) from
the top of the rear bumper (D) by removing the
3/8” hardware (A, B, & E) securing the shield to
the bumper.
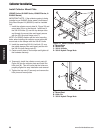
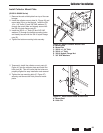
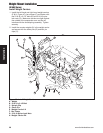
Install Collector Mount Plate
(IS3100Z Series with 5-Tube Rear Bumper)
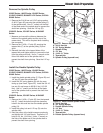
1. Install the collector mount plate (A, Figure 37) on
to the bumper. Install two of the 3/8-16 U-bolts
(C) over the second tube down from the top of the
bumper and through the mounting plate and
loosely secure with the 3/8-16 nylock flange nuts
(B).
2. Install the remaining 3/8-16 U-bolt bolt (C) over
the forth tube down from the top of the bumper
and loosely secure with the 3/8-16 nylock flange
nuts (B).
3. Center mount plate on the bumper and tighten all
the hardware securely.
B
C
A
Figure 35. Remove the Rear Engine Shield
A. 3/8-16X1” Bolts
B. 3/8”Washers
C. Rear Engine Shield
D. Rear Bumper
E. 3/8” Nylon Flange Nuts
C
D
E
A
B
A
C
B
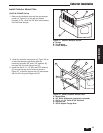
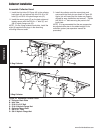
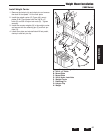
Install Collector Mount Plate
(IS3100Z Series with 4-Tube Rear Bumper)
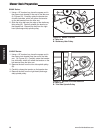
1. Install the collector mount plate (A, Figure 36) on
to the bumper. Install two of the 3/8-16 U-bolts
(C) over the top bumper tube and through the
mounting plate and loosely secure with the 3/8-16
nylock flange nuts (B).
2. Install the remaining 3/8-16 U-bolt bolt (C) over
the third tube down from the top of the bumper
and loosely secure with the 3/8-16 nylock flange
nuts (B).
3. Center mount plate on the bumper and tighten all
the hardware securely.
Figure 37. Install Collector Mount Plate
A. Mount Plate
B. 3/8-16 Nylock Flange Nuts
C. 3/8-16 U-Bolts
Figure 36. Install Collector Mount Plate
A. Mount Plate
B. 3/8-16 Nylock Flange Nuts
C. 3/8-16 U-Bolts
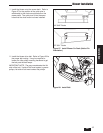
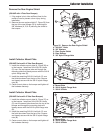
Collector Installation